| Tested on | Windows 11 host with VirtualBox 7.x — Kali GNU/Linux Rolling 2026.2 at 192.168.56.120 attacking Metasploitable 2 at 192.168.56.127 on host-only 192.168.56.0/24 |
|---|---|
| Package | Oracle VirtualBox 7.xMetasploitable 2.0.0 |
| Privilege | Host administrator rights to install VirtualBox; sudo on Kali for package installs |
| Scope | Group 1 of the PenTest+ lab — VirtualBox host-only network, Kali attacker VM, and a Metasploitable 2 target, with DVWA installed inside Kali. Covers adapter layout, static addressing, verification, and snapshots. Does not cover hardware sizing, other lab groups, or exploitation walkthroughs — see pentest lab requirements. |
| Related guides | Android Studio AVD lab Genymotion Desktop lab |
A penetration testing lab gives you legal, isolated targets for ethical hacking practice. This guide builds a two-VM layout on Oracle VirtualBox: Kali Linux as the attacker and Metasploitable 2 as the network target, with DVWA installed inside Kali instead of a third VM.
Your host can stay Ubuntu while Kali runs in a VM. If you only need one or two scanners on the host (nmap, nikto, …), install them from Ubuntu apt first—see install Kali Linux tools on Ubuntu before you add kali-rolling or spin up a full Kali guest.
This guide installs Group 1 from pentest lab requirements — the VirtualBox build for recon, scanning, web apps, and service exploitation in the CompTIA PenTest+ course.
This layout allocates about 9 GiB of VM RAM (8 GiB Kali, 1 GiB Metasploitable). Plan for 16 GiB of host RAM minimum and ~50 GiB of free disk for most lessons — see pentest lab requirements if you will install Greenbone feeds (100 GiB+). Your host can stay on Ubuntu or Windows; install scanners on the host only when you follow install Kali Linux tools on Ubuntu safely—this lab’s attacker role still belongs on the Kali guest.
Lab topology
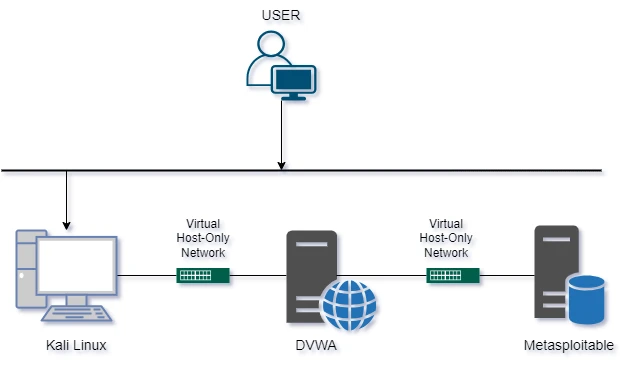
This course uses the VirtualBox host-only subnet 192.168.56.0/24, with the host adapter at 192.168.56.1. The course reserves 192.168.56.120 for Kali and 192.168.56.127 for Metasploitable — configure those addresses in Step 5 and Step 7 after you disable DHCP on the host-only network.
| Role | VM | Adapters | Static IP |
|---|---|---|---|
| Attacker (and local web target) | Kali Linux + DVWA | Host-only + NAT | 192.168.56.120 |
| Network target | Metasploitable 2 | Host-only only | 192.168.56.127 |
Kali needs two adapters for two jobs:
- Host-only — reach Metasploitable on the lab subnet
- NAT — reach the Internet for
apt update, package upgrades, tool downloads, and wordlists
VirtualBox's standard NAT adapter normally gives the guest an address in the 10.0.2.0/24 range; you do not configure that address manually.
Metasploitable gets host-only only, which keeps a deliberately vulnerable host off your LAN.
Do not attach Internet-facing networking to Metasploitable. A NAT adapter gives the vulnerable VM outbound Internet access, while a bridged adapter places it directly on your LAN. Neither is needed for this lab; keep Metasploitable host-only.
Metasploitable 2 console: msfadmin / msfadmin. After Step 8 verification, take snapshots named kali-group1-clean and metasploitable2-clean before your first exploit.
Lab components and install order
The table below shows each component, its role, and why it is included in the lab — enough surface area to practice recon, network exploitation, web attacks, and Metasploit workflows without touching a production network.
| Component | What it is | Why it is included |
|---|---|---|
| Oracle VirtualBox | Free desktop hypervisor on your Windows, Linux, or macOS host | Runs multiple VMs on one physical machine, supports snapshots for reset between exercises, and ships host-only networking for isolation without extra hardware |
| Host-only virtual network | Private VirtualBox subnet shared only by your lab VMs | Keeps exploit traffic, malware samples, and ARP/DNS lab tricks off your home LAN and the Internet |
| Kali NAT adapter (second NIC) | Outbound Internet path for the attacker VM only | Lets Kali run package updates and tool downloads while Metasploitable stays on host-only with no route to the Internet |
Follow these steps in order. Each step links to a dedicated guide where the full Kali or DVWA install is already documented with screenshots.
| Step | Task | Section |
|---|---|---|
| 1 | Install VirtualBox on your host | Step 1 |
| 2 | Create the host-only lab network | Step 2 |
| 3 | Install Kali Linux | Step 3 |
| 4 | Attach host-only and NAT adapters on Kali | Step 4 |
| 5 | Set static 192.168.56.120 on Kali |
Step 5 |
| 6 | Install DVWA inside Kali (Kali needs working NAT/Internet first) | Step 6 |
| 7 | Install Metasploitable 2 and set static 192.168.56.127 |
Step 7 |
| 8 | Verify connectivity and take snapshots | Step 8 |
Do not skip ahead — Metasploitable needs the host-only network from Step 2, and verification in Step 8 assumes Kali is already on that subnet. Finish Steps 7 and 8 before web exploitation lessons such as DVWA SQL injection.
Step-by-step lab build
Work through Steps 1–8 in order. Screenshots below were captured on VirtualBox 7.x with a Windows 11 host; menu names may differ slightly on Linux or macOS hosts.
Step 1: Install VirtualBox on the host
- Open the Oracle VirtualBox downloads page.
- Download the installer for your host OS (Windows, macOS, or Linux).
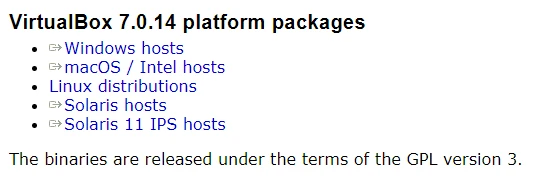
- Run the installer and accept the defaults on Windows, or follow install Oracle VirtualBox on Linux on RHEL-family hosts.
- Optionally install the Extension Pack from the same page if you later need USB 2/3 passthrough. Nothing in this lab requires it.
- Confirm VirtualBox opens without errors before you continue.
Step 2: Create the host-only network
This private subnet is what keeps the vulnerable target off your home LAN, so get it right before you create any VM.
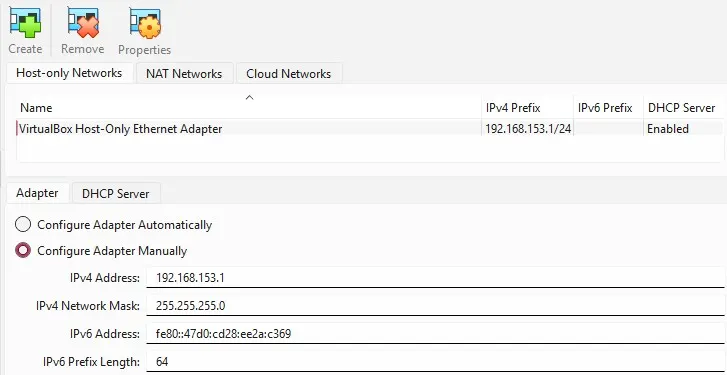
- In VirtualBox, open File → Tools → Network, then select the Host-only Networks tab.
- If the list is empty, click Create to add a host-only adapter before you continue. Fresh installs often have none until you create one.
- Select VirtualBox Host-Only Ethernet Adapter, open the Adapter tab, choose Configure Adapter Manually, and confirm the IPv4 address is
192.168.56.1with mask255.255.255.0. That192.168.56.1address is the host end of the segment, not a VM address. Kali and Metasploitable get192.168.56.120and192.168.56.127from the static steps in Step 5 and Step 7.
- Switch to the DHCP Server tab and clear Enable Server. Step 5 and Step 7 assign static addresses on each VM, so this adapter does not need to hand out leases. Confirm Enable Server is unchecked — the server address and lease range fields remain visible but inactive.
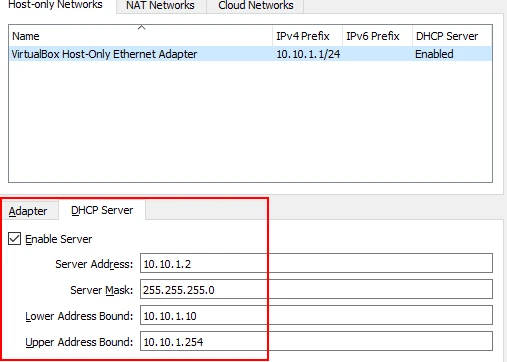
- Click Apply.
Step 3: Install Kali Linux
- Follow Install Kali Linux on VirtualBox for ISO download, partitioning, and first boot (bare-metal ISO or pre-built VirtualBox image).
- PenTest+ lab overrides: The linked Kali guide defaults to a smaller VM. Size Kali for Group 1 using the RAM, disk, and vCPU values in pentest lab requirements — Group 1. Do not stop after the linked guide finishes; continue with Step 4 to attach host-only plus NAT adapters.
- Confirm the Kali VM boots to a login prompt before you change network settings.
Step 4: Configure network on Kali
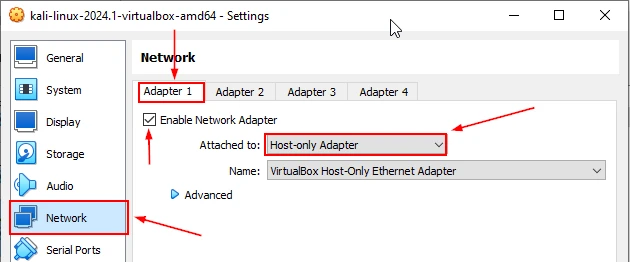
- Select the Kali VM → Settings → Network.
- Set Adapter 1: Enabled, Host-only Adapter (the network from Step 2).
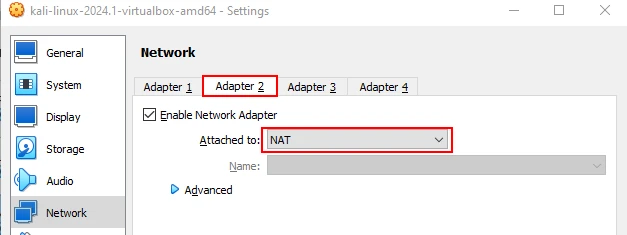
- Set Adapter 2: Enabled, NAT for package updates, tool downloads, and wordlists. Optionally configure SSH from the host into the Kali VM with NAT port forwarding when you do not want to bridge lab traffic to the physical LAN.
- Start Kali and log in. If you imported Kali's official prebuilt VirtualBox image, the default login is
kali/kali. If you installed Kali from the ISO, use the account created during installation. - Confirm both interfaces came up:
ip -4 addr showYou should see two interfaces. The NAT interface should normally have a 10.0.2.x address. The host-only interface may not have an IPv4 address yet because DHCP is disabled in Step 2. Step 5 assigns 192.168.56.120 manually. If the host-only link is missing entirely, the adapter is attached to the wrong network in Step 4.
Step 5: Set static host-only address on Kali
Identify the host-only NIC before you assign 192.168.56.120. In VirtualBox, open Settings → Network → Adapter 1 → Advanced and note the MAC Address. Inside Kali, match that MAC to the interface name:
ip link showUse the interface whose MAC matches Adapter 1 — not Adapter 2 (NAT). Names such as eth0, eth1, enp0s3, and enp0s8 vary by image; the MAC match is the reliable check. The examples below use eth0; replace it with your host-only ifname.
The host-only interface may have no IPv4 address because DHCP is disabled. Configure the static address below.
NetworkManager may already have created a connection profile for Adapter 1. Reuse it if present; otherwise create the lab-hostonly profile.
List existing NetworkManager profiles on that interface:
nmcli -t -f UUID,NAME,DEVICE con showIf a profile already exists on the host-only interface, modify that profile instead of deleting unrelated connections (which could remove the NAT profile):
sudo nmcli con modify "<existing-profile-name>" ipv4.method manual ipv4.addresses 192.168.56.120/24 ipv4.never-default yes
sudo nmcli con up "<existing-profile-name>"
If no usable profile is attached to the host-only interface, create one:
sudo nmcli con add type ethernet ifname eth0 con-name lab-hostonly
sudo nmcli con modify lab-hostonly ipv4.method manual ipv4.addresses 192.168.56.120/24 ipv4.never-default yes
sudo nmcli con up lab-hostonly
Do not set a gateway on this profile — Adapter 2 (NAT) keeps the default route for apt.
Confirm the static address:
ip -4 addr show eth0Step 6: Install DVWA inside Kali
DVWA runs on the Kali VM rather than as its own guest. Before you install: confirm Kali has Internet through Adapter 2 (NAT). From a Kali shell, run ping -c 2 8.8.8.8. If that fails, finish Step 4 (enable NAT) before you run apt or pull Docker images.
Follow install DVWA on Kali Linux, which covers the Kali dvwa package, Docker Compose, and a manual Apache stack.
The course uses the separate Kali-hosted DVWA because its dedicated installation guide and later web lessons assume that environment; the older DVWA bundled with Metasploitable remains available as an additional target but is not the course baseline.
Two things matter for this lab:
- DVWA on Kali is a local web target. Browser and Burp exercises against
127.0.0.1stay inside Kali and do not traverse the host-only network. Metasploitable is the separate network target used when a lesson needs attacker-to-target traffic across the host-only subnet. - Keep the course DVWA bound to
127.0.0.1unless a later lesson explicitly requires access from another lab VM. Note the port your chosen method uses — the Kali package serveshttp://127.0.0.1:42001, while Docker Compose in that guide publisheshttp://127.0.0.1:4280. Verify the port you picked in Step 8.
Web exploitation lessons such as DVWA SQL injection come after Metasploitable is installed and Step 8 verification passes.
Step 7: Install Metasploitable 2
- Download
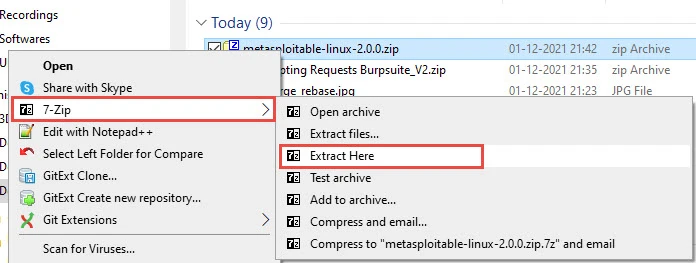
metasploitable-linux-2.0.0.zipfrom SourceForge. - Extract the archive to a folder on your host.
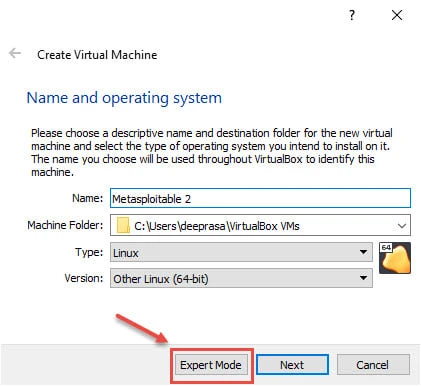
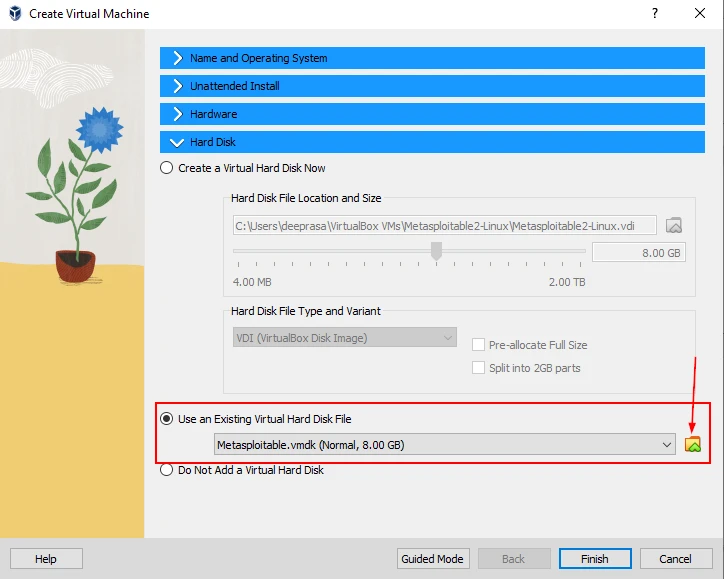
- In VirtualBox, click Machine → New → Expert Mode.
- Size Metasploitable for Group 1 using pentest lab requirements — Group 1.
- Attach the extracted VMDK as the virtual hard disk.
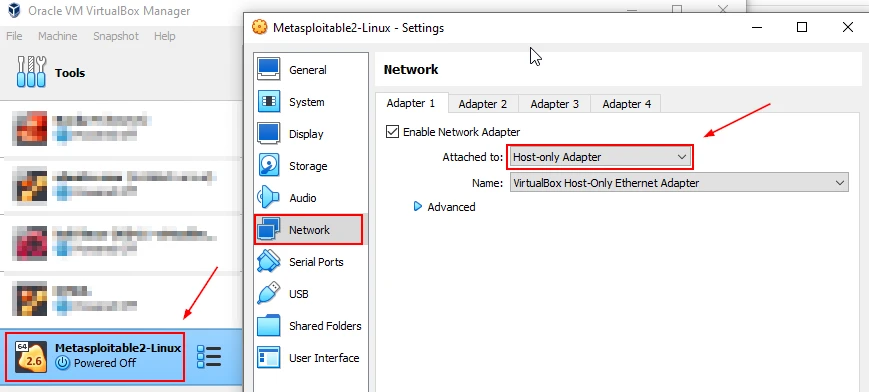
- Open Settings → Network → Adapter 1: Host-only Adapter (same network as Kali). Do not use bridged networking for this lab.
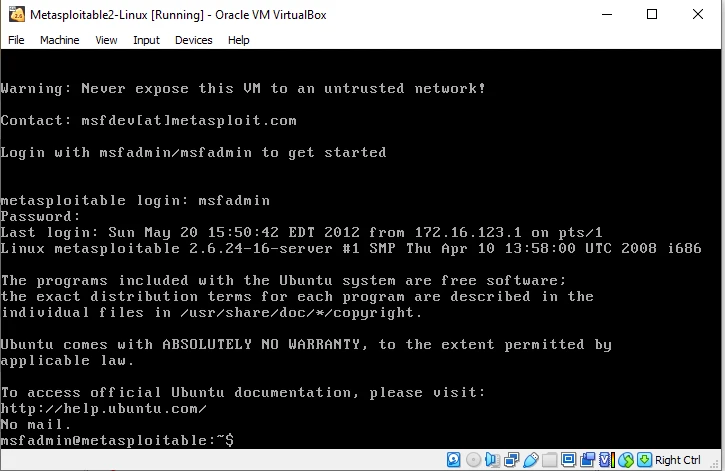
- Start the VM and log in at the console with msfadmin / msfadmin.
- Assign the course target address
192.168.56.127oneth0. Metasploitable ships with DHCP in/etc/network/interfaces; replace that stanza with a static block:
sudo cp /etc/network/interfaces /etc/network/interfaces.bakWrite the static stanza:
cat | sudo tee /etc/network/interfaces <<'EOF'
auto lo
iface lo inet loopback

auto eth0
iface eth0 inet static
address 192.168.56.127
netmask 255.255.255.0
EOF
Apply the change:
sudo /etc/init.d/networking restartIf eth0 still does not show 192.168.56.127, confirm Adapter 1 is attached to the same host-only network as Kali, verify the eth0 stanza in /etc/network/interfaces, and restart networking once more.
Confirm the address:
ip -4 addr show eth0- From Kali, open
http://192.168.56.127/in a browser. The page confirms both the network path and the web stack. Those links on the Metasploitable web menu are separate from the DVWA instance on Kali. Common targets on the stock image include:
- TWiki
- phpMyAdmin
- Mutillidae
- DVWA (on the target VM, not your Kali install)
- WebDAV
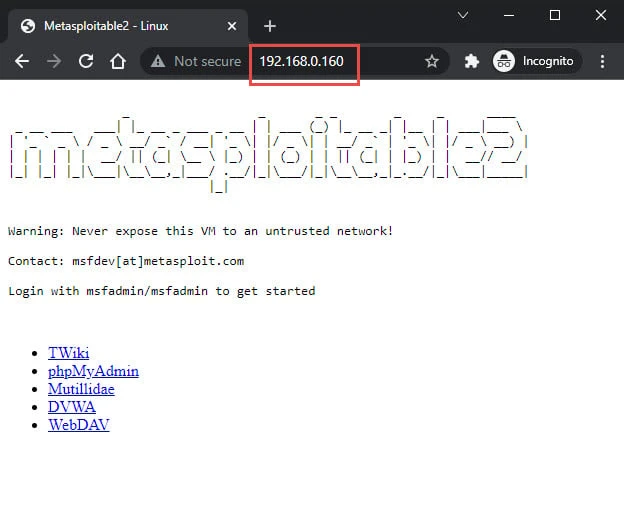
Continue exploitation in learn hacking with Metasploitable 2.
Step 8: Verify the lab and snapshot each VM
Export the course target address once per shell before you run the checks below. These exports last for the current shell only — re-run the block in a new terminal.
export TARGET=192.168.56.127
export KALI_IP=192.168.56.120
Confirm Kali reaches Metasploitable:
ping -c 2 192.168.56.127PING 192.168.56.127 (192.168.56.127) 56(84) bytes of data.
64 bytes from 192.168.56.127: icmp_seq=1 ttl=64 time=1.44 ms
64 bytes from 192.168.56.127: icmp_seq=2 ttl=64 time=0.899 ms
--- 192.168.56.127 ping statistics ---
2 packets transmitted, 2 received, 0% packet loss, time 1001ms
rtt min/avg/max/mdev = 0.899/1.171/1.443/0.272 msIf ping fails, sweep the segment instead of guessing:
sudo nmap -sn 192.168.56.0/24Nmap scan report for 192.168.56.1
Host is up (0.0011s latency).
MAC Address: 0A:00:27:00:00:07 (Unknown)
Nmap scan report for 192.168.56.127
Host is up (0.00070s latency).
MAC Address: 08:00:27:33:AF:98 (Oracle VirtualBox virtual NIC)
Nmap scan report for 192.168.56.120
Host is up.
Nmap done: 256 IP addresses (3 hosts up) scanned in 2.84 secondsWith DHCP disabled as configured in Step 2, three responsive addresses are expected:
192.168.56.1— VirtualBox host adapter on the segment192.168.56.120— Kali (the machine running the scan)192.168.56.127— Metasploitable
Anything else on this segment is another VM left attached to the host-only adapter.
Then run the service spot checks:
| Check | Command | Expected |
|---|---|---|
| Metasploitable SSH | nmap -p 22 --open 192.168.56.127 |
Port 22 open |
| Metasploitable web | curl -I http://192.168.56.127/ |
HTTP/1.1 200 OK with Server: Apache/2.2.8 |
| DVWA on Kali (package) | curl -I http://127.0.0.1:42001/ |
HTTP 200 or redirect to setup |
| DVWA on Kali (Docker) | curl -I http://127.0.0.1:4280/ |
HTTP 200 or redirect — run only if you used Docker Compose in Step 6 |
| Kali Internet path | ping -c 2 8.8.8.8 |
Replies via the NAT adapter |
| Target routing | ip route on Metasploitable |
No default via ... line |
| Target isolation | ping -c 2 8.8.8.8 on Metasploitable |
100% packet loss (secondary confirmation) |
The routing check is the stronger isolation test. On Metasploitable, confirm Settings → Network shows only one adapter and that adapter is Host-only. Then run:
ip routeYou should see a local route only, for example:
192.168.56.0/24 dev eth0 proto kernel scope link src 192.168.56.127There should be no default via ... route. A failed Internet ping alone does not prove isolation if ICMP is blocked but another path exists.
Finally, snapshot Kali and Metasploitable in VirtualBox. Name them kali-group1-clean and metasploitable2-clean after networking and DVWA verification, before exploitation. Restore those snapshots between exercises so each service starts from a known state.
Troubleshooting
| Problem | Likely cause | Fix |
|---|---|---|
| Kali cannot ping Metasploitable | VMs on different networks | Match the host-only adapter on both VMs in Settings → Network |
| Host-only NIC has no IPv4 on Kali | Static profile missing or wrong interface | Repeat Step 5; confirm Adapter 1 MAC matches the interface you configured |
| Ports show open but scripts return nothing | Scan is crossing NAT instead of the host-only segment | Confirm ip addr on Kali shows 192.168.56.120, and scan from that interface |
| No Internet on Kali | NAT adapter missing | Enable Adapter 2 as NAT on Kali only |
| Wrong lab IP after reboot | Static profile missing or typo in /etc/network/interfaces or nmcli |
Re-check Step 5 and Step 7 item 8; confirm with ip -4 addr show on each VM |
| Metasploitable VM fails to boot | VMDK not attached correctly or wrong storage/controller configuration | Open Settings → Storage, confirm the extracted Metasploitable VMDK is attached, then retry |
| Metasploitable can reach the Internet | NAT or bridged adapter attached to the target | Remove it — host-only only; confirm with ip route (no default route) |
Summary
Group 1 is now ready: Kali has host-only connectivity to Metasploitable and NAT for updates, DVWA runs locally on Kali, Metasploitable has no default route to the Internet, and both VMs have clean baseline snapshots.
That stack covers most hands-on lessons in the course. When a lesson needs Active Directory or cloud targets, switch to the lab group listed in pentest lab requirements. Keep every scan and exploit inside these isolated networks.
Next steps (after Step 8 verification):
- Network reconnaissance with Nmap — host discovery and version detection against Metasploitable at
192.168.56.127 - Nmap NSE scripts — automated service enumeration on the open ports you just verified
- Metasploit tutorial —
msfconsolebasics against the network target - DVWA SQL injection — web attacks against the DVWA instance on Kali at
127.0.0.1
Frequently Asked Questions
Why use a host-only network for a pentest lab?
A VirtualBox host-only adapter keeps attacker and target VMs on an isolated subnet. Lab traffic does not reach your LAN or the Internet, so misconfigured exploits and malware stay inside the virtual network.
Do I need NAT on Kali as well as host-only?
Yes for most setups. Host-only connects Kali to Metasploitable. A second NAT adapter lets Kali download packages, update packaged security tools, and pull wordlists without exposing your target to the Internet. Attach NAT to Kali only, never to Metasploitable.
Why is DVWA installed on Kali instead of its own VM?
Running DVWA inside Kali avoids another guest OS, virtual disk, network adapter, and snapshot set. It also matches the environment used by the course's dedicated DVWA web lessons.
What are the default Metasploitable 2 credentials?
Console login is msfadmin / msfadmin. Restore the metasploitable2-clean snapshot before you run exploits so you can return to a clean state.
Can I use VMware instead of VirtualBox?
Yes. Install the same Kali and Metasploitable images in VMware Workstation and attach both VMs to a private host-only or internal network. The topology matches; only the hypervisor UI differs.
Is it legal to run these vulnerable VMs?
Metasploitable 2 and DVWA are intentionally vulnerable images for training. Running them on your own isolated lab is fine. Never point lab tools or exploits at systems you do not own or are not explicitly authorized to test.