| Tested on | Rocky Linux 10.2 (Red Quartz) workstation |
|---|---|
| Package | kubectl 1.36.3 |
| Applies to | Any host with kubectl configured; any Kubernetes cluster |
| Cert prep | CKA · CKAD |
| Lab environment | Multi-node kubeadm cluster with containerd — install Kubernetes with kubeadm |
| Privilege | Normal user (no sudo required on the workstation) |
| Scope | DaemonSet YAML, verification, nodeSelector, control-plane toleration, rollout, scaling behaviour, deletion, and common problems. Does not cover full affinity rules, complete taints tutorial, CNI install, probes, resource limits, host networking, or static Pods. |
| Related guides | Choose a Kubernetes workload resource Deployments and rolling updates |
This walkthrough uses one DaemonSet named node-agent in the ds-lab namespace. The container image is nginx only as a lightweight demonstration stand-in. It does not collect logs or monitor the node. You will:
- deploy the agent on eligible nodes
- restrict placement to labelled nodes with
nodeSelector - remove that selector and add a toleration for the control-plane taint
- roll out an image update
What Is a Kubernetes DaemonSet?
A DaemonSet maintains one Pod on every eligible node in the cluster.
- When a new eligible node joins, the controller creates a DaemonSet Pod on it
- When an eligible node is removed, its DaemonSet Pod is deleted
- Node selectors, affinity, taints, and tolerations determine which nodes count as eligible
The controller reconciles one Pod per eligible node. That is not a fixed replica count like a Deployment.
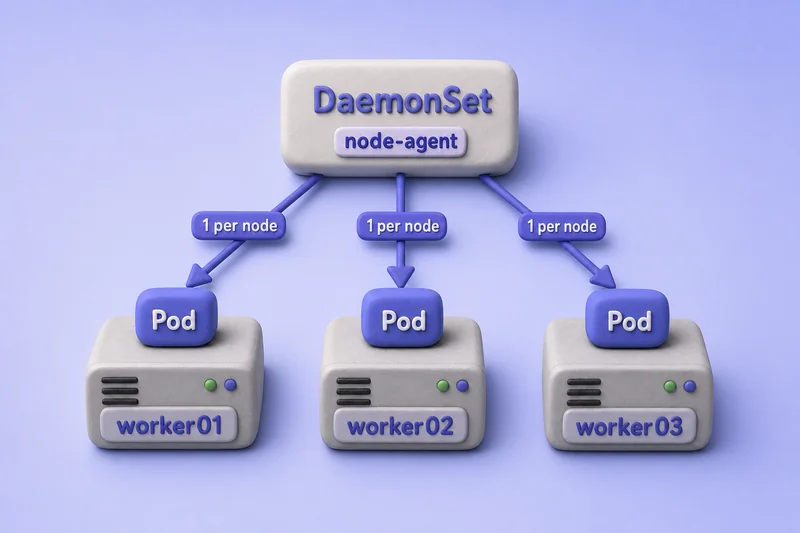
Each arrow in the diagram represents one node-agent Pod on an eligible node:
- when a new eligible node joins, the controller adds another Pod
- when a node leaves or becomes ineligible, its Pod is removed
When Should You Use a DaemonSet?
DaemonSets suit node-level agents that must run on all or selected nodes:
- log collection agents
- node monitoring agents
- networking plugins
- storage agents
- security or system-management agents
Deployments maintain a requested replica count, while DaemonSets follow eligible node count. See Deployment versus DaemonSet for the full comparison.
Create a Kubernetes DaemonSet
Save this manifest as node-agent-daemonset.yaml:
apiVersion: apps/v1
kind: DaemonSet
metadata:
  name: node-agent
  namespace: ds-lab
  labels:
    app: node-agent
spec:
  selector:
    matchLabels:
      app: node-agent
  template:
    metadata:
      labels:
        app: node-agent
    spec:
      containers:
        - name: agent
          image: nginx:1.27-alpine
Create the namespace, then apply the DaemonSet:
kubectl create namespace ds-labSample output:
namespace/ds-lab createdkubectl apply -f node-agent-daemonset.yamlSample output:
daemonset.apps/node-agent createdWait for the rollout to finish before you check Pod placement:
kubectl rollout status daemonset/node-agent -n ds-labSample output:
daemon set "node-agent" successfully rolled outList DaemonSets and check Pod placement:
kubectl get daemonsets -n ds-labSample output:
NAME         DESIRED   CURRENT   READY   UP-TO-DATE   AVAILABLE   NODE SELECTOR   AGE
node-agent 1 1 1 1 1 <none> 8skubectl get pods -n ds-lab -o wideSample output:
NAME               READY   STATUS    RESTARTS   AGE   IP             NODE       NOMINATED NODE   READINESS GATES
node-agent-npfjb   1/1     Running   0          2s    192.168.5.26   worker01   <none>           <none>
On this two-node lab cluster, DESIRED is 1 even though two nodes exist:
- the control-plane node
k8s-cpcarries aNoScheduletaint - without a matching toleration, the DaemonSet Pod schedules only on
worker01 - you add a toleration later in Use Taints and Tolerations with DaemonSets
Inspect controller events:
kubectl describe daemonset node-agent -n ds-labThe Events section at the bottom should show SuccessfulCreate entries from the DaemonSet controller.
Understand DaemonSet YAML
The node-agent manifest above is a minimal DaemonSet. These fields matter most when you read or extend it.
| Field | Role |
|---|---|
apiVersion: apps/v1 |
DaemonSet lives in the apps API group |
kind: DaemonSet |
Workload controller for per-node Pods |
metadata.name |
DaemonSet object name in the namespace |
spec.selector |
Labels that identify Pods this DaemonSet owns |
spec.template |
Pod spec copied to each eligible node |
spec.template.spec.restartPolicy |
Must be Always or omitted (defaults to Always); OnFailure and Never are not allowed |
spec.updateStrategy |
How template changes roll out (default RollingUpdate) |
Unlike a Deployment, there is no spec.replicas field. Eligible node count drives Pod count instead.
Selector and Pod-template labels
spec.selector tells the DaemonSet controller which Pods in the namespace it manages:
- it is usually
matchLabelswith one or more key/value pairs - DaemonSet also supports
matchExpressionsfor set-based selectors. See Kubernetes labels and selectors for expression syntax. - the selector is immutable after the DaemonSet is created. To change which labels the controller matches, create a new DaemonSet with a different name and selector.
Label matching rules are strict:
spec.selector.matchLabelsmust match labels underspec.template.metadata.labels- Extra labels on the Pod template are allowed
- A mismatch causes the API server to reject the manifest
In this manifest, both the selector and template use app: node-agent.
Save this complete manifest as bad-ds.yaml. The selector and template labels disagree:
apiVersion: apps/v1
kind: DaemonSet
metadata:
  name: bad-ds
  namespace: ds-lab
spec:
  selector:
    matchLabels:
      app: node-agent
  template:
    metadata:
      labels:
        app: wrong
    spec:
      containers:
        - name: agent
          image: nginx:1.27-alpine
A server dry-run surfaces the error before you apply:
kubectl apply --dry-run=server -f bad-ds.yamlSample output:
The DaemonSet "bad-ds" is invalid: spec.template.metadata.labels: Invalid value: {"app":"wrong"}: `selector` does not match template `labels`Pod template and node assignment
spec.template is the Pod spec the controller materialises on each eligible node. Container image, ports, volumes, nodeSelector, affinity, and tolerations all belong under spec.template.spec, not at the DaemonSet spec root.
Each eligible node receives its own Pod object from this template. Pod names are generated with a DaemonSet prefix and random suffix, such as node-agent-rr654.
The controller and scheduler work together on each Pod:
- the DaemonSet controller creates the Pod and injects required node affinity for its target host
- the default scheduler binds the Pod to that node
SuccessfulCreateevents come from the DaemonSet controller, not from free scheduling decisions
No replica count
DaemonSets do not use spec.replicas. The controller sets desired Pod count from eligible nodes and reports it as DESIRED in kubectl get daemonset. You cannot scale a DaemonSet with kubectl scale.
Pod count changes when:
- eligible nodes join or leave
- node labels change
nodeSelectoror required affinity changes- tolerations change which tainted nodes are eligible
Removing the node-role=monitoring label from worker01 would drop that node from a selector-restricted DaemonSet and terminate its Pod automatically.
Update strategy
spec.updateStrategy.type controls how template changes roll out:
RollingUpdate(default) replaces DaemonSet Pods during image or template changesOnDeletecreates updated Pods only after you manually delete old ones
kubectl rollout status is available only when the DaemonSet uses RollingUpdate. With OnDelete, update the template, manually delete old Pods, and inspect the recreated Pods to verify that they use the new template. Kubectl returns an error when rollout status is requested for an OnDelete DaemonSet.
Rollout detail and maxUnavailable tuning are covered later in Update a Kubernetes DaemonSet.
Run a DaemonSet on Selected Nodes
By default, node-agent schedules on every eligible node. To limit coverage to specific machines, you need two pieces working together:
- Node labels mark which nodes should run the agent
nodeSelectoron the Pod template tells the DaemonSet controller which nodes are eligible. The controller creates a Pod targeted at each matching node, and the scheduler then binds it there.
Labels alone do not change DaemonSet behaviour. Until the Pod template includes a matching nodeSelector, the controller still targets all eligible nodes.
Label the target nodes
Add a label to the nodes where the agent should run. This lab labels the worker:
kubectl label node worker01 node-role=monitoring --overwriteSample output:
node/worker01 labeledConfirm the label:
kubectl get nodes --show-labels | grep -E 'NAME|worker01'Sample output:
NAME       STATUS   ROLES    AGE   VERSION   LABELS
worker01   Ready    <none>   35h   v1.36.3   ...node-role=monitoring
k8s-cp does not carry this label yet. For label syntax, see Kubernetes labels and selectors.
Add nodeSelector
Edit node-agent-daemonset.yaml and add nodeSelector under spec.template.spec. That is the only change from the manifest you applied earlier:
spec:
      nodeSelector:
        node-role: monitoring
      containers:
        - name: agent
          image: nginx:1.27-alpine
The label key/value pair node-role=monitoring must match the label you placed on the node. The DaemonSet controller excludes nodes without that label and creates Pods only for matching nodes.
Re-apply the same file:
kubectl apply -f node-agent-daemonset.yamlSample output:
daemonset.apps/node-agent configuredWait for the rollout to finish:
kubectl rollout status daemonset/node-agent -n ds-labSample output:
daemon set "node-agent" successfully rolled outConfirm the active nodeSelector and eligible node count:
kubectl get daemonset node-agent -n ds-labSample output:
NAME         DESIRED   CURRENT   READY   UP-TO-DATE   AVAILABLE   NODE SELECTOR          AGE
node-agent   1         1         1       1            1           node-role=monitoring   1m
Only one node is eligible, and node-role=monitoring is active on the Pod template.
Verify Pod placement
kubectl get pods -n ds-lab -o wideSample output:
NAME               READY   STATUS    RESTARTS   AGE   IP             NODE       NOMINATED NODE   READINESS GATES
node-agent-z8ltf   1/1     Running   0          2s    192.168.5.32   worker01   <none>           <none>
Only worker01 matches the selector, so one Pod runs there. If you removed the label from worker01, the DaemonSet would terminate its Pod because no node would match.
Required node affinity supports richer set-based rules than nodeSelector and can restrict which nodes are eligible for the DaemonSet. Preferred affinity does not reduce the eligible-node set, so it should not be used as the primary way to select which nodes receive DaemonSet Pods.
The DaemonSet controller evaluates the original node affinity when deciding eligible nodes. It then replaces that affinity on each created Pod with required affinity for the specific target node.
Use Taints and Tolerations with DaemonSets
A DaemonSet that must run on every node, including the control plane, needs a toleration for any taint that would otherwise exclude those nodes. See Kubernetes taints and tolerations for the full model (taint effects, kubectl taint, and scheduling events). Here you extend the lab in two steps after the nodeSelector exercise:
- remove the restrictive
nodeSelectorfrom the Pod template - add a toleration that matches the control-plane taint
Verify the control-plane taint
This kubeadm control-plane node carries the node-role.kubernetes.io/control-plane:NoSchedule taint. Verify it on your cluster before adding a toleration:
kubectl describe node k8s-cp | grep TaintsSample output:
Taints: node-role.kubernetes.io/control-plane:NoScheduleThat taint blocks normal Pods unless they carry a matching toleration.
Remove nodeSelector and add the toleration
A toleration removes a taint restriction, but it does not override a nodeSelector:
- while
node-role=monitoringremains on the Pod template, the DaemonSet still targets only labelled nodes - adding a control-plane toleration alone cannot place a Pod on
k8s-cpuntil you remove thatnodeSelector
Remove the nodeSelector block from node-agent-daemonset.yaml and add the toleration under spec.template.spec:
spec:
      tolerations:
        - key: node-role.kubernetes.io/control-plane
          operator: Exists
          effect: NoSchedule
      containers:
        - name: agent
          image: nginx:1.27-alpine
Removing nodeSelector and adding the toleration changes eligibility together:
- without
nodeSelector, both nodes are open to the DaemonSet again - the toleration allows the Pod to schedule on the tainted control-plane node
Apply the updated manifest:
kubectl apply -f node-agent-daemonset.yamlSample output:
daemonset.apps/node-agent configuredWait for the rollout to finish:
kubectl rollout status daemonset/node-agent -n ds-labSample output:
daemon set "node-agent" successfully rolled outAutomatic DaemonSet tolerations
Kubernetes also adds several tolerations to DaemonSet Pods automatically:
not-readyandunreachablenode conditions- memory, disk, and PID pressure taints
node.kubernetes.io/unschedulable:NoSchedule(cordoned nodes)
The control-plane-role taint is not among those automatic tolerations, so this lab adds it explicitly.
Because DaemonSet Pods automatically tolerate node.kubernetes.io/unschedulable:NoSchedule, cordoning a node does not remove its existing DaemonSet Pod and does not necessarily prevent a new DaemonSet Pod from being placed there. kubectl drain refuses to proceed when DaemonSet-managed Pods exist unless you use --ignore-daemonsets; even with that option, drain leaves those DaemonSet Pods running.
This behaviour is specific to DaemonSets and important for node maintenance. Do not run drain as part of this lab. The explanatory note is enough.
Verify both nodes
kubectl get daemonsets -n ds-labSample output:
NAME         DESIRED   CURRENT   READY   UP-TO-DATE   AVAILABLE   NODE SELECTOR   AGE
node-agent   2         2         2       2            2           <none>          48s
The kubectl get daemonset output changes for two reasons:
NODE SELECTORreturns to<none>because you removed the selector from the Pod templateDESIREDrises to2because both nodes are eligible again and the toleration satisfies the control-plane taint
kubectl get pods -n ds-lab -o wideSample output:
NAME               READY   STATUS    RESTARTS   AGE   IP               NODE       NOMINATED NODE   READINESS GATES
node-agent-snng5   1/1     Running   0          2s    192.168.5.31     worker01   <none>           <none>
node-agent-tfh65   1/1     Running   0          6s    192.168.62.139   k8s-cp     <none>           <none>
Generated Pod names and IP addresses vary between clusters.
Verify and Manage a DaemonSet
kubectl get daemonset reports several reconciliation columns:
| Column | Meaning |
|---|---|
DESIRED |
Total eligible nodes that should run the DaemonSet Pod |
CURRENT |
Eligible nodes currently running at least one DaemonSet Pod |
READY |
Eligible nodes with at least one DaemonSet Pod whose Ready condition is true |
UP-TO-DATE |
Nodes running the current Pod-template revision |
AVAILABLE |
Eligible nodes with a Pod ready for at least minReadySeconds |
NODE SELECTOR |
nodeSelector on the Pod template, if set |
List DaemonSet Pods and the node hosting each one:
kubectl get pods -n ds-lab -l app=node-agent -o wideInspect scheduling and controller events:
kubectl describe daemonset node-agent -n ds-labSample Events excerpt:
  Normal  SuccessfulCreate  77s   daemonset-controller  Created pod: node-agent-gj42p
  Normal  SuccessfulCreate  70s   daemonset-controller  Created pod: node-agent-fq2pj
  Normal  SuccessfulDelete  59s   daemonset-controller  Deleted pod: node-agent-fq2pj
Delete one managed Pod and watch the controller replace it:
kubectl delete pod -n ds-lab -l app=node-agent --field-selector spec.nodeName=worker01Sample output:
pod "node-agent-snng5" deletedAfter manually deleting a Pod, no new DaemonSet rollout or Pod-template revision starts. kubectl rollout status can return success immediately based on the existing rollout state. It is intended to watch the latest resource rollout, not reconciliation after an individual Pod is deleted.
Watch until a new Pod with a different suffix reaches Running on worker01, then press Ctrl+C:
kubectl get pods -n ds-lab -l app=node-agent -o wide --watchSample output (trimmed):
NAME               READY   STATUS    RESTARTS   AGE   IP               NODE
node-agent-2v4j6   1/1     Running   0          2s    192.168.5.33     worker01
node-agent-tfh65   1/1     Running   0          9s    192.168.62.139   k8s-cp
The sample omits NOMINATED NODE and READINESS GATES columns that -o wide normally includes.
After you delete one managed Pod, the controller replaces only that node’s Pod:
- the Pod on
worker01has a new generated suffix - the existing control-plane Pod remains unchanged
- generated Pod names and IP addresses vary between clusters
- the DaemonSet still reconciles one Pod per eligible node
Update a Kubernetes DaemonSet
Update the image
Change the image in the manifest and re-apply, or patch the running DaemonSet:
kubectl set image daemonset/node-agent agent=nginx:1.28-alpine -n ds-labSample output:
daemonset.apps/node-agent image updatedkubectl set image updates the live DaemonSet but not node-agent-daemonset.yaml. Keep the lab manifest at nginx:1.27-alpine so the following rollback returns the cluster to the image declared in the original file. In a normal declarative workflow, update and apply the manifest instead of making an unrecorded live-only change.
kubectl set image updates the resource's Pod template through the API unless it is explicitly run locally against a file.
Watch the rollout
kubectl rollout status daemonset/node-agent -n ds-labSample output:
Waiting for daemon set "node-agent" rollout to finish: 1 out of 2 new pods have been updated...
daemon set "node-agent" successfully rolled out
View history and roll back
kubectl rollout history daemonset/node-agent -n ds-labSample output (four Pod-template revisions before rollback):
REVISION  CHANGE-CAUSE
1         <none>
2         <none>
3         <none>
4         <none>
These revisions correspond to the initial template, adding nodeSelector, removing nodeSelector and adding the toleration, and updating the image.
Each change to the DaemonSet Pod template creates a ControllerRevision:
CHANGE-CAUSEremains<none>unless you set thekubernetes.io/change-causeannotation- changes to
nodeSelector, tolerations, and the image all modify the Pod template and create new revisions
Roll back to the previous revision:
kubectl rollout undo daemonset/node-agent -n ds-labSample output:
daemonset "node-agent" rolled backkubectl rollout status daemonset/node-agent -n ds-labSample output:
Waiting for daemon set "node-agent" rollout to finish: 1 out of 2 new pods have been updated...
daemon set "node-agent" successfully rolled out
A rollback does not move the DaemonSet back to an older revision number. Kubernetes applies the older Pod template as a new revision, so revision numbers only move forward during a DaemonSet rollback. Without --to-revision, kubectl rollout undo selects the most recent previous revision.
After rolling revision 4 back to the template from revision 3, the restored template can become revision 5. A subsequent kubectl rollout history can then list revisions 1, 2, 4, and 5 instead of 1 through 5.
Understand update strategies
| Strategy | Behaviour |
|---|---|
RollingUpdate |
Replaces existing Pods automatically in a controlled rollout (default) |
OnDelete |
Creates updated Pods only after you manually delete old Pods |
One Pod per eligible node describes the steady state. During rollout, behaviour depends on maxSurge and maxUnavailable:
- with
maxSurgegreater than zero, an eligible node can temporarily run both an old and a new DaemonSet Pod - the default is
maxSurge: 0andmaxUnavailable: 1 maxUnavailablelimits how many Pods may be unavailable during the rolloutmaxSurgelimits how many extra Pods may exist above the node count during the rollout
Both fields live under spec.updateStrategy.rollingUpdate. This article does not tune them. See the upstream DaemonSet docs when you need finer control.
Common DaemonSet Problems
| Symptom | Likely cause | Fix |
|---|---|---|
| Apply fails with selector does not match template labels | DaemonSet selector and template labels differ | Align the labels and apply again |
DESIRED is correct but CURRENT or READY is lower |
Pod cannot start or become Ready on one or more nodes | Inspect Pod Events, image status, resources, kubelet state, and readiness |
Pods remain Pending |
Scheduler block, resource shortage, volume mount failure, or image pull error | Inspect kubectl describe pod Events; for general Pending diagnosis, see Kubernetes Pods and Pod Lifecycle |
What's Next
- Kubernetes Jobs with Examples
- Kubernetes CronJobs with Examples
- Kubernetes Liveness, Readiness and Startup Probes
References
- DaemonSet
- Perform a Rolling Update on a DaemonSet
- Perform a Rollback on a DaemonSet
- Taints and Tolerations
- Assign Pods to Nodes
Summary
A Kubernetes DaemonSet keeps one Pod on every eligible node. A minimal manifest needs:
apiVersion: apps/v1andkind: DaemonSet- a
spec.selectorthat matchesspec.template.metadata.labels - a container template under
spec.template - no
spec.replicasfield. Eligible node count drives Pod count instead. restartPolicyset toAlwaysor omitted (defaults toAlways)
On the lab cluster, the first apply scheduled one Pod on worker01 because the control-plane taint excluded k8s-cp until we added a toleration.
Placement rules work in layers:
- node labels plus
nodeSelectornarrow which nodes count as eligible - a toleration lifts a taint block but does not override
nodeSelectorrules - remove a restrictive
nodeSelectorbefore a control-plane toleration can schedule onk8s-cp - after both changes,
DESIREDrose to2and Pods ran onworker01andk8s-cp
Updates and rollouts:
- change the image with
kubectl set imageor by editing the manifest - watch progress with
kubectl rollout status - roll back with
kubectl rollout undowhen needed - the default
RollingUpdatestrategy replaces Pods without manual deletion
For DaemonSet versus Deployment scenarios and a decision checklist, see Deployment versus DaemonSet. When DESIRED looks wrong, check taints and selectors before chasing Pod-level errors.
Frequently Asked Questions
What does a Kubernetes DaemonSet do?
A DaemonSet ensures one Pod runs on every eligible node in the cluster. When nodes are added or removed, the controller creates or deletes DaemonSet Pods to match eligible node count.
How is a DaemonSet different from a Deployment?
A Deployment runs a requested number of interchangeable replicas, and the scheduler places them on suitable nodes. A DaemonSet runs one Pod per eligible node for node-level agents such as log collectors or monitoring daemons. Use a Deployment for interchangeable app replicas; use a DaemonSet when every eligible node must run the agent.
Why is my DaemonSet DESIRED count lower than my node count?
Only eligible nodes count. Control-plane taints, nodeSelector, affinity, and missing tolerations can exclude nodes. DESIRED reflects eligible nodes, not total cluster nodes.
Can I scale a DaemonSet with kubectl scale?
No. DaemonSets do not use spec.replicas. Pod count changes when nodes join or leave, or when you change node labels, nodeSelector, affinity, or tolerations.
How do I update a DaemonSet container image?
Edit the manifest and kubectl apply, or use kubectl set image. Watch progress with kubectl rollout status daemonset/