| Tested on | CentOS 7 |
|---|---|
| Package | mdadm (1.2 array metadata)e2fsprogs (mkfs.ext4) |
| Applies to | RHEL, Rocky Linux, AlmaLinux, Oracle Linux, CentOS Stream, Fedora, Debian, Ubuntu, and other Linux distributions with mdadm |
| Privilege | sudo or root for mdadm, mkfs, and mount |
| Scope | Create a two-member software RAID 0 stripe with mdadm, verify with /proc/mdstat and mdadm --detail, format, mount, and add an /etc/fstab entry. Does not cover hardware RAID, LVM-on-RAID, or recovery after disk failure. |
Software RAID 0 in Linux stripes data across member disks for throughput. There is no mirroring or parity. If one disk fails, data on the array is usually lost. This guide creates a two-partition RAID 0 array with mdadm, formats it with ext4, and mounts it at /mnt/raid0.
Quick reference: software RAID 0 with mdadm
| Step | Command |
|---|---|
| Confirm member partitions | lsblk |
| Create RAID 0 stripe | mdadm -Cv -l0 -c64 -n2 /dev/md0 /dev/sd{b,c}1 |
| Check array state | cat /proc/mdstat and mdadm --detail /dev/md0 |
| Create ext4 filesystem | mkfs.ext4 /dev/md0 |
| Mount the volume | mount /dev/md0 /mnt/raid0 |
| Verify free space | df -h /mnt/raid0 |
Prepare two unused partitions or whole disks before running mdadm. A legacy MBR 0xFD partition type is not required for modern mdadm 1.x metadata; arrays assemble from MD superblocks through mdadm and initramfs. See Configure linear RAID if you need append mode instead of striping.
What is RAID 0?
RAID 0 — striping — interleaves data across members in chunk-sized pieces. With a 64 KiB chunk on two disks, Linux writes 64 KiB to one member before moving to the next member in the stripe, then alternates back to the first disk.
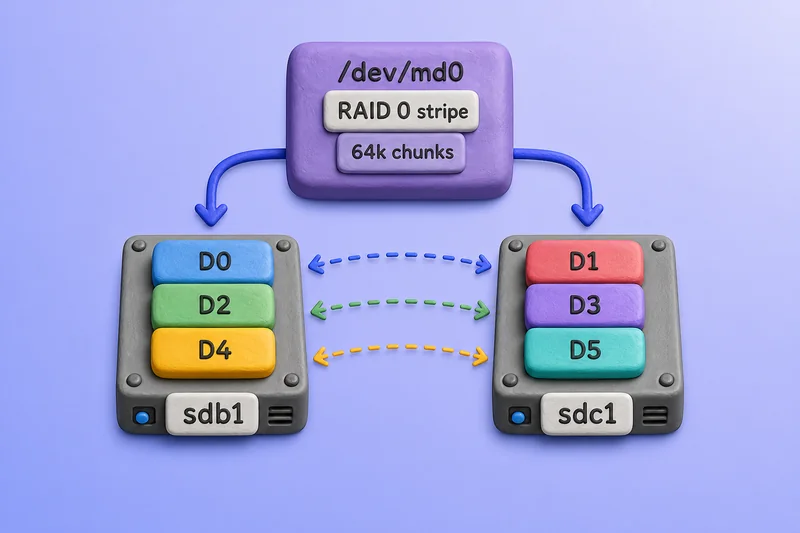
The figure shows why RAID 0 is fast but fragile: RAID 0 has no redundancy. If any member fails, part of the striped address space disappears and the filesystem is normally unusable. For capacity without striping, use linear RAID instead.
Prerequisites: two member partitions
In the lab, sdb1 and sdc1 were prepared on two 3 GB data disks before mdadm ran.
Confirm the partitions are visible:
lsblk[root@node1 ~]# lsblk
NAME MAJ:MIN RM SIZE RO TYPE MOUNTPOINT
sda 8:0 0 30G 0 disk
├─sda1 8:1 0 512M 0 part /boot
└─sda2 8:2 0 27.5G 0 part
├─centos-root 253:0 0 25.5G 0 lvm /
└─centos-swap 253:1 0 2G 0 lvm [SWAP]
sdb 8:16 0 3G 0 disk
└─sdb1 8:17 0 3G 0 part
sdc 8:32 0 3G 0 disk
└─sdc1 8:33 0 3G 0 part
sr0 11:0 1 1024M 0 romStep 1: Create the RAID 0 array
Build /dev/md0 as a stripe across sdb1 and sdc1. The examples use -c64 for a 64 KiB chunk size. With -c64, Linux writes 64 KiB to one member before moving to the next member in the stripe. Tune chunk size for your workload or use mdadm defaults when unsure.
mdadm -Cv -l0 -c64 -n2 /dev/md0 /dev/sd{b,c}1[root@node1 ~]# mdadm -Cv -l0 -c64 -n2 /dev/md0 /dev/sd{b,c}1
mdadm: Defaulting to version 1.2 metadata
mdadm: array /dev/md0 started.The flags used above:
-C, --create     Create a new array.
-v, --verbose    More detail during creation.
-l, --level=     RAID level (0 = stripe).
-c, --chunk=     Chunk size in kilobytes.
-n, --raid-devices=   Number of active devices.
Step 2: Verify the RAID 0 array
Check that the kernel registered a raid0 personality on /dev/md0:
cat /proc/mdstat[root@node1 ~]# cat /proc/mdstat
Personalities : [raid0]
md0 : active raid0 sdc1[1] sdb1[0]
6283264 blocks super 1.2 64k chunks
unused devices:64k chunks matches the -c64 argument from the create step.
mdadm --detail shows the same array from the mdadm side — RAID level, array size, chunk size, active devices, metadata version, and state:
mdadm --detail /dev/md0Confirm Raid Level is raid0, Chunk Size is 64K, Raid Devices is 2, and State is clean.
Step 3: Create a filesystem and mount point
Format the stripe with ext4 — see mke2fs command for other filesystem types:
mkfs.ext4 /dev/md0[root@node1 ~]# mkfs.ext4 /dev/md0
mke2fs 1.42.9 (28-Dec-2013)
Filesystem label=
OS type: Linux
Block size=4096 (log=2)
Fragment size=4096 (log=2)
Stride=16 blocks, Stripe width=32 blocks
393216 inodes, 1570816 blocks
78540 blocks (5.00%) reserved for the super user
First data block=0
Maximum filesystem blocks=1608515584
48 block groups
32768 blocks per group, 32768 fragments per group
8192 inodes per group
Superblock backups stored on blocks:
32768, 98304, 163840, 229376, 294912, 819200, 884736
Allocating group tables: done
Writing inode tables: done
Creating journal (32768 blocks): done
Writing superblocks and filesystem accounting information: doneCreate a mount point for the array:
mkdir /mnt/raid0Mount /dev/md0 on the new directory:
mount /dev/md0 /mnt/raid0Confirm usable space:
df -h /mnt/raid0[root@node1 ~]# df -h /mnt/raid0
Filesystem Size Used Avail Use% Mounted on
/dev/md0 5.8G 24M 5.5G 1% /mnt/raid0Step 4: Persist the mount across reboot
A manual mount is temporary. Add the filesystem to /etc/fstab so it mounts at boot:
tail -n 1 /etc/fstab[root@node1 ~]# tail -n 1 /etc/fstab
/dev/md0 /mnt/raid0 ext4 defaults 0 0After reboot, confirm the mount came back:
df -h /mnt/raid0[root@node1 ~]# df -h /mnt/raid0
Filesystem Size Used Avail Use% Mounted on
/dev/md0 5.8G 24M 5.5G 1% /mnt/raid0References
- RHEL 10 — Creating a software RAID on an installed system — official installed-system workflow with
mdadm - Linux
mdadm(8)manual — https://man7.org/linux/man-pages/man8/mdadm.8.html - Linux
md(4)manual — https://man7.org/linux/man-pages/man4/md.4.html
Summary
Software RAID 0 in Linux stripes data across member disks for raw throughput with no redundancy. This guide created /dev/md0 from sdb1 and sdc1 with mdadm -Cv -l0 -c64 -n2, verified raid0 with /proc/mdstat and mdadm --detail, formatted ext4, and mounted the volume at /mnt/raid0.
Treat RAID 0 as a performance layout, not a fault-tolerant one. For append-only capacity without striping, see Configure linear RAID; for mirroring or parity, use RAID 1 or RAID 5. Day-to-day mdadm operations live in the mdadm command cheat sheet.
Frequently Asked Questions
What is the difference between RAID 0 and linear RAID?
RAID 0 stripes data across disks in fixed-size chunks for higher throughput. Linear RAID appends one disk after another with no striping. Both lack redundancy — any single disk failure loses data on the array.
How many disks do I need for software RAID 0 in Linux?
At least two unused disks or partitions. RAID 0 can use different-size members. Linux stripes across all members while space is available on each, then continues with smaller stripes across the devices that still have free space. Equal-size members provide the simplest layout.
Does RAID 0 provide redundancy?
No. RAID 0 has no redundancy. If any member fails, part of the striped address space disappears and the filesystem is normally unusable.