| Tested on | CentOS 7 |
|---|---|
| Package | mdadme2fsprogs (mkfs.ext4)MD superblock metadata version 1.2 |
| Applies to | RHEL, Rocky Linux, AlmaLinux, Oracle Linux, CentOS Stream, Fedora, Debian, Ubuntu, and other Linux distributions with mdadm |
| Privilege | sudo or root for mdadm, mkfs, and mount |
| Scope | Create a three-member software RAID 5 array with mdadm, verify initial recovery in /proc/mdstat, format, and mount. Brief note on creating a larger array with a spare. Does not cover hardware RAID, LVM-on-RAID, growing existing arrays, or replacing failed members in production. |
| Related guides | Configure software RAID 0 Configure software RAID 1 |
Software RAID 5 in Linux stripes data and distributes parity across every member disk. One disk can fail without losing the array, at the cost of one disk worth of usable capacity. This guide creates a three-partition RAID 5 array with mdadm, watches the initial recovery, and formats the volume.
Quick reference: software RAID 5 with mdadm
| Step | Command |
|---|---|
| Confirm member partitions | lsblk |
| Create RAID 5 array | mdadm -Cv -l5 -c64 -n3 -pls /dev/md0 /dev/sd{b,c,d}1 |
| Check array state | cat /proc/mdstat |
| Create ext4 filesystem | mkfs.ext4 /dev/md0 |
| Mount the volume | mount /dev/md0 /raid5_array |
Prepare three or more unused partitions or whole disks of similar usable size before running mdadm. A legacy MBR 0xFD partition type is not required for modern mdadm 1.x metadata; arrays assemble from MD superblocks through mdadm and initramfs.
What is RAID 5?
RAID 5 is similar to RAID 4, except parity is spread across all drives instead of living on one dedicated disk. Each stripe stores one parity chunk; the parity disk rotates with each stripe so write load is shared.
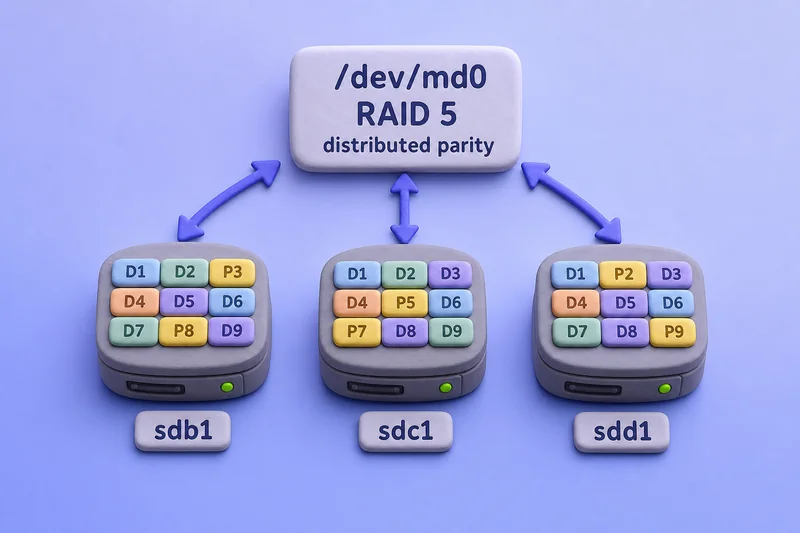
With N disks of size S, usable capacity is roughly (N-1) * S — the same as RAID 4, but without the dedicated parity bottleneck. RAID 5 tolerates only one disk failure; if two members die, data on the array is lost.
Prerequisites: three member partitions
In the lab, sdb1, sdc1, and sdd1 were prepared on three 2 GB data disks before mdadm ran.
Confirm the partitions are visible:
lsblk[root@node1 ~]# lsblk
NAME MAJ:MIN RM SIZE RO TYPE MOUNTPOINT
sda 8:0 0 30G 0 disk
├─sda1 8:1 0 512M 0 part /boot
└─sda2 8:2 0 27.5G 0 part
├─centos-root 253:0 0 25.5G 0 lvm /
└─centos-swap 253:1 0 2G 0 lvm [SWAP]
sdb 8:16 0 2G 0 disk
└─sdb1 8:17 0 2G 0 part
sdc 8:32 0 2G 0 disk
└─sdc1 8:33 0 2G 0 part
sdd 8:48 0 2G 0 disk
└─sdd1 8:49 0 2G 0 part
sr0 11:0 1 1024M 0 romStep 1: Create the RAID 5 array
Build /dev/md0 as RAID 5 across sdb1, sdc1, and sdd1. The -pls flags select the left-symmetric parity layout. Left-symmetric (ls) is the default RAID 5 layout in mdadm, so -pls is unnecessary unless you want to state the layout explicitly.
mdadm -Cv -l5 -c64 -n3 -pls /dev/md0 /dev/sd{b,c,d}1[root@node1 ~]# mdadm -Cv -l5 -c64 -n3 -pls /dev/md0 /dev/sd{b,c,d}1
mdadm: /dev/sdb1 appears to contain an ext2fs file system
size=2096128K mtime=Wed Jun 12 11:21:25 2019
mdadm: size set to 2094080K
Continue creating array? y
mdadm: Defaulting to version 1.2 metadata
mdadm: array /dev/md0 started.If mdadm reports an existing filesystem or RAID signature, stop and confirm the device contains no data you need. The prompt above appeared because /dev/sdb1 had been used before. Do not answer y blindly on production hardware.
The flags used above:
-C, --create     Create a new array.
-v, --verbose    More detail during creation.
-l, --level=     RAID level (5 = distributed parity).
-c, --chunk=     Chunk size in kilobytes.
-n, --raid-devices=   Number of active devices.
-p, --layout=    Parity layout (ls = left-symmetric, the default).
Other RAID 5 layouts include right-symmetric, left-asymmetric, and right-asymmetric (rs, la, ra). Left-symmetric (ls) is the default RAID 5 layout in mdadm.
Step 2: Verify recovery in /proc/mdstat
RAID 5 runs an initial recovery after creation. By default, mdadm starts the array with one member offline and rebuilds it while parity is written across the stripes.
cat /proc/mdstat[root@node1 ~]# cat /proc/mdstat
Personalities : [raid6] [raid5] [raid4]
md0 : active raid5 sdd1[3] sdc1[1] sdb1[0]
4188160 blocks super 1.2 level 5, 64k chunk, algorithm 2 [3/2] [UU_]
[=======>.............] recovery = 38.1% (800128/2094080) finish=0.0min speed=266709K/sec
unused devices: <none>This does not mean the third disk was omitted from the create command. By default, mdadm creates a new RAID 5 temporarily degraded and rebuilds the final member because that is generally faster than synchronizing parity across a fully populated but unclean array. [3/2] [UU_] therefore represents the expected initial-build state in these examples. The recovery = 38.1% line confirms parity initialization is underway. You can create a filesystem before recovery finishes, but the array is not fully redundant until [3/3] [UUU] appears and the recovery line disappears.
When the recovery line disappears and [3/3] [UUU] is shown, all three members are active and synchronized.
Wait for recovery to complete, then confirm a clean state:
cat /proc/mdstat[root@node1 ~]# cat /proc/mdstat
Personalities : [raid6] [raid5] [raid4]
md0 : active raid5 sdd1[3] sdc1[1] sdb1[0]
4188160 blocks super 1.2 level 5, 64k chunk, algorithm 2 [3/3] [UUU]
unused devices: <none>[3/3] [UUU] means all three members are present and in sync. algorithm 2 in the mdstat line corresponds to left-symmetric parity — the same layout selected by -pls.
Step 3: Create a filesystem and mount point
Format the RAID 5 volume with ext4 — see mke2fs command for other filesystem types:
mkfs.ext4 /dev/md0Create a mount point for the array:
mkdir /raid5_arrayMount /dev/md0 on the new directory:
mount /dev/md0 /raid5_arraymount is temporary. Add the filesystem to /etc/fstab using its UUID, and ensure the MD array definition is present in your distribution's mdadm configuration or initramfs so /dev/md0 assembles before the mount is attempted. See create filesystem and partition in Linux for fstab patterns.
Create a larger RAID 5 array with a spare
To create a RAID 5 array with five active members plus one spare:
mdadm -C -l5 -c64 -n5 -x1 /dev/md0 /dev/sd{b,f,c,g,d,h}1-n5 means five active RAID devices, while -x1 adds one spare, so six component devices are required. This command creates a new array. It does not expand an existing three-disk /dev/md0. To add members to a running RAID 5, use mdadm --grow.
With one failed member, the RAID 5 array can continue operating, but reads that require data from the missing member must reconstruct it from the remaining data and parity. Performance can therefore degrade until the failed member is replaced and recovery completes.
References
- Linux kernel RAID wiki — RAID 5
- Linux
mdadm(8)manual — https://man7.org/linux/man-pages/man8/mdadm.8.html - Linux
md(4)manual — https://man7.org/linux/man-pages/man4/md.4.html
Summary
Software RAID 5 in Linux distributes parity across member disks for fault tolerance without a dedicated parity bottleneck. This guide created /dev/md0 from sdb1, sdc1, and sdd1 with mdadm -Cv -l5 -c64 -n3 -pls, verified recovery progressing from [UU_] to [UUU] in /proc/mdstat, and formatted the volume with ext4.
The mdadm detail output shows left-symmetric parity (algorithm 2) and a signature prompt on a reused partition. Inspect devices before answering y. To create a larger array at build time, set --raid-devices and --spare-devices on mdadm --create; to expand an existing RAID 5, use mdadm --grow. Day-to-day mdadm operations live in the mdadm command cheat sheet. For dedicated parity layouts, compare with Configure software RAID 4.
Frequently Asked Questions
What is the difference between RAID 4 and RAID 5?
RAID 4 keeps parity on one dedicated disk. RAID 5 stripes parity across all members, which removes the write bottleneck on a single parity drive. Both tolerate one disk failure and leave (N-1) times the smallest member size as usable capacity.
How many disks do I need for software RAID 5 in Linux?
At least three unused disks or partitions of similar usable size. At creation time, --raid-devices sets the active member count and --spare-devices sets the spare count. Expanding an existing RAID 5 array uses mdadm --grow.
What does the -pls flag mean in mdadm RAID 5?
The -p ls options select the left-symmetric parity layout, which is the mdadm default for RAID 5. You can omit -pls on modern mdadm because left-symmetric is already the default.