| Tested on | CentOS 7 |
|---|---|
| Package | mdadm (1.2 array metadata)e2fsprogs (mkfs.ext4) |
| Applies to | RHEL, Rocky Linux, AlmaLinux, Oracle Linux, CentOS Stream, Fedora, Debian, Ubuntu, and other Linux distributions with mdadm |
| Privilege | sudo or root for mdadm, mkfs, and mount |
| Scope | Create a three-member software RAID 4 array with mdadm, verify synchronization in /proc/mdstat and mdadm --detail, format, and mount. Notes RAID 5 as the usual alternative. Does not cover hardware RAID, spare-disk replacement workflows, or growing arrays in production. |
| Related guides | Configure software RAID 0 Configure software RAID 1 |
Software RAID 4 in Linux stripes data in fixed-size chunks across data disks and keeps parity on one dedicated member. A single disk failure can be rebuilt from the remaining data and parity blocks. This guide creates a three-partition RAID 4 array with mdadm, watches parity initialization, and formats the volume. RAID 5 distributes parity instead and is the better default for new deployments. See Configure software RAID 5 when you do not need a dedicated parity disk layout.
Quick reference: software RAID 4 with mdadm
| Step | Command |
|---|---|
| Create RAID 4 array | mdadm -Cv -l4 -c64 -n3 /dev/md0 /dev/sd{b,c,d}1 |
| Check array state | cat /proc/mdstat |
| Create ext4 filesystem | mkfs.ext4 /dev/md0 |
| Mount the volume | mount /dev/md0 /raid4_array |
Prepare three unused partitions or whole disks of similar usable size before running mdadm. A legacy MBR 0xFD partition type is not required for modern mdadm 1.x metadata; arrays assemble from MD superblocks through mdadm and initramfs. On GPT you may optionally mark partitions with the Linux RAID partition type for clarity.
What is RAID 4?
RAID 4 stripes data in fixed-size chunks across each data drive in the array. One drive is dedicated to parity. For each stripe, the parity block contains the XOR of the corresponding data blocks. When data changes, Linux updates the parity information so one missing member can be reconstructed.
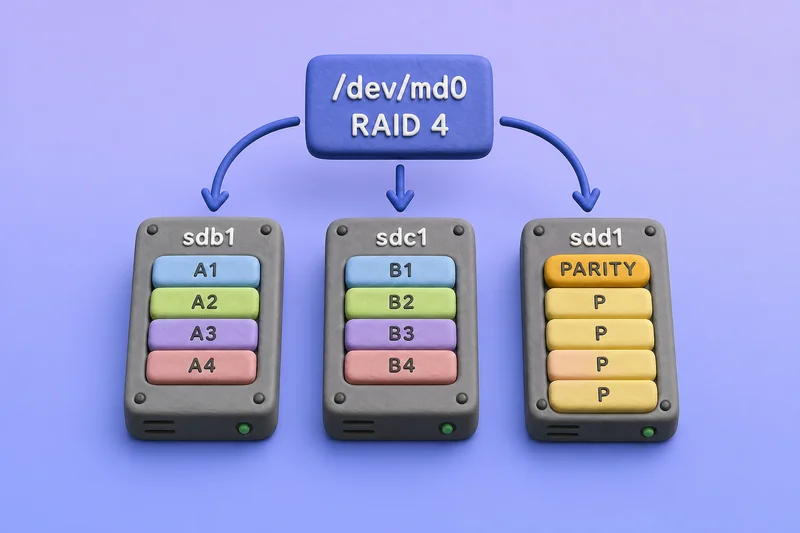
With N disks of size S and one dedicated parity disk, usable capacity is roughly (N-1) * S — the same formula as RAID 5, but all parity I/O concentrates on the last member. That dedicated parity disk becomes a write bottleneck under heavy load, which is why RAID 5 replaced RAID 4 in most production designs.
Step 1: Create the RAID 4 array
In the lab, sdb1, sdc1, and sdd1 were prepared on three 2 GB data disks. Build /dev/md0 as RAID 4 across them. The last device on the command line — here /dev/sdd1 — becomes the dedicated parity disk.
mdadm -Cv -l4 -c64 -n3 /dev/md0 /dev/sd{b,c,d}1[root@node1 ~]# mdadm -Cv -l4 -c64 -n3 /dev/md0 /dev/sd{b,c,d}1
Continue creating array? y
mdadm: Defaulting to version 1.2 metadata
mdadm: array /dev/md0 started.If mdadm reports an existing filesystem or RAID signature, stop and confirm the device contains no data you need. The signature prompt above appeared on a reused partition. Do not answer y blindly on production hardware. Inspect signatures with wipefs and remove stale ones only after verifying the device is safe to erase.
The flags used above:
-C, --create     Create a new array.
-v, --verbose    More detail during creation.
-l, --level=     RAID level (4 = dedicated parity stripe).
-c, --chunk=     Chunk size in kilobytes (64 KiB in this lab).
-n, --raid-devices=   Number of active devices in the array.
The examples use a 64 KiB chunk size (-c64). That is not a universal best value. Tune chunk size for your workload or allow current mdadm defaults when you have no measured reason to override it.
Step 2: Verify synchronization in /proc/mdstat
After creation, mdadm initializes RAID 4 parity. Depending on the mdadm/kernel version and creation path, /proc/mdstat may report this synchronization as resync or recovery. The preserved CentOS 7 output below shows recovery.
cat /proc/mdstat[root@node1 ~]# cat /proc/mdstat
Personalities : [raid6] [raid5] [raid4]
md0 : active raid4 sdd1[3] sdc1[1] sdb1[0]
4188160 blocks super 1.2 level 4, 64k chunk, algorithm 0 [3/2] [UU_]
[========>............] recovery = 40.9% (858880/2094080) finish=8.1min speed=214720K/sec
unused devices: <none>[3/2] [UU_] means three RAID devices are configured but only two are currently in sync — the third member is still catching up during synchronization. The recovery = 40.9% line confirms parity initialization is underway. You can create a filesystem before synchronization finishes, but the array is not fully redundant until [3/3] [UUU] appears and the progress line disappears.
RAID 4 parity initialization requires parity calculation across the stripe and can consume additional I/O and CPU while synchronization is running.
Wait for synchronization to complete, then confirm a clean state:
cat /proc/mdstat[root@node1 ~]# cat /proc/mdstat
Personalities : [raid6] [raid5] [raid4]
md0 : active raid4 sdd1[3] sdc1[1] sdb1[0]
4188160 blocks super 1.2 level 4, 64k chunk, algorithm 0 [3/3] [UUU]
unused devices: <none>[3/3] [UUU] means all three members are present and in sync. sdd1 is the dedicated parity member because RAID 4 stores parity on the last active device. The [3] shown by /proc/mdstat is an md device number, not the parity position.
mdadm --detail shows each member's RaidDevice position more clearly:
mdadm --detail /dev/md0Sample output:
           Raid Level : raid4
           Raid Devices : 3
          Total Devices : 3
                State : clean
         Active Devices : 3
        Working Devices : 3

    Number   Major   Minor   RaidDevice State
       0       8       17        0      active sync   /dev/sdb1
       1       8       33        1      active sync   /dev/sdc1
       3       8       49        2      active sync   /dev/sdd1
Raid Level : raid4 and State : clean confirm the array finished initialization. sdd1 sits at RaidDevice 2, the last active position, which is where Linux RAID 4 keeps parity. The Number column (3 for sdd1) is the md member index shown in brackets by /proc/mdstat — it is not the parity slot by itself.
Step 3: Create a filesystem and mount point
Format the RAID 4 volume with ext4 — see mke2fs command for other filesystem types:
mkfs.ext4 /dev/md0Create a mount point for the array:
mkdir /raid4_arrayMount /dev/md0 on the new directory:
mount /dev/md0 /raid4_arraymount is temporary. Add /dev/md0 or the filesystem UUID to /etc/fstab if you want the filesystem mounted automatically after the MD array is assembled at boot.
RAID 4 vs RAID 5
| Topic | RAID 4 | RAID 5 |
|---|---|---|
| Parity layout | One dedicated parity disk | Parity distributed across all members |
| Write bottleneck | Parity disk limits sustained writes | Better write scaling |
| Usable capacity | (N-1) * S |
(N-1) * S |
| Typical use today | Legacy layouts, teaching parity | Default parity choice with mdadm |
For new arrays, use Configure software RAID 5 unless you have a specific reason to keep a dedicated parity disk.
References
- Linux
md(4)manual — https://man7.org/linux/man-pages/man4/md.4.html - Linux kernel MD documentation — https://docs.kernel.org/admin-guide/md.html
- Red Hat Enterprise Linux 10 — Managing RAID — https://docs.redhat.com/en/documentation/red_hat_enterprise_linux/10/html/managing_storage_devices/managing-raid_managing-storage-devices
- Linux
mdadm(8)manual — https://man7.org/linux/man-pages/man8/mdadm.8.html
Summary
Software RAID 4 in Linux stripes data across member disks and stores parity on one dedicated drive. This guide created /dev/md0 from sdb1, sdc1, and sdd1 with mdadm -Cv -l4 -c64 -n3, where sdd1 became the parity member. The /proc/mdstat output shows synchronization progressing from [UU_] to [UUU] as parity blocks were written, and mdadm --detail confirms Raid Level : raid4 with sdd1 at RaidDevice 2.
RAID 4 teaches how block-level parity works, but RAID 5 is the practical choice for most new parity arrays because it removes the dedicated parity disk bottleneck. Before creating arrays on production hardware, use three unused partitions of closely matched size, wait for synchronization to reach [UUU] when you need full redundancy, and add the filesystem to /etc/fstab if you want it mounted at boot. Day-to-day mdadm operations live in the mdadm command cheat sheet.
Frequently Asked Questions
What is the difference between RAID 4 and RAID 5?
RAID 4 stripes data across member disks and stores parity on one dedicated disk. RAID 5 distributes parity across all members, which removes the write bottleneck on a single parity drive. Both tolerate one disk failure and leave (N-1) times the smallest member size as usable capacity.
How many disks do I need for software RAID 4 in Linux?
At least three unused disks or partitions of similar usable size — two data members plus one dedicated parity member. mdadm designates the last device listed on the create command line as the parity disk.
Should I use RAID 4 or RAID 5 with mdadm?
RAID 5 is almost always the better choice for new arrays because distributed parity avoids the dedicated parity disk bottleneck. RAID 4 remains useful for understanding block-level parity and for matching legacy layouts.