| Tested on | CentOS 7 |
|---|---|
| Package | mdadm (1.2 array metadata)e2fsprogs (mkfs.ext4) |
| Applies to | RHEL, Rocky Linux, AlmaLinux, Oracle Linux, CentOS Stream, Fedora, Debian, Ubuntu, and other Linux distributions with mdadm |
| Privilege | sudo or root for mdadm, mkfs, and mount |
| Scope | Nested software RAID 10 (RAID 1+0) with mdadm on four partitions — create mirrors, stripe them, format, and mount. Brief note on native mdadm --level=10. Does not cover hardware RAID, LVM-on-RAID, or replacing failed members in production. |
| Related guides | Configure software RAID 0 Configure software RAID 1 |
Software RAID 10 in Linux pairs mirroring with striping. This guide builds a nested RAID 1+0 stack with mdadm: a RAID 0 stripe across two RAID 1 mirrors (/dev/md0 and /dev/md1 form the mirrors; /dev/md2 is the top-level stripe). That is a different Linux MD implementation from native mdadm --level=10, which creates one RAID 10 device with near, far, or offset layout options. Four disks give the traditional two-way mirrored-and-striped layout, but MD RAID 10 also supports other device counts and layouts.
sdb1 through sde1). For new deployments, also evaluate native mdadm --create --level=10 --raid-devices=4 on a four-disk layout like this lab — see the mdadm command cheat sheet. The nested method here matches how the layers appear in /proc/mdstat.
Quick reference: software RAID 10 with mdadm
| Step | Command |
|---|---|
| Confirm member partitions | lsblk |
| Create first mirror (RAID 1) | mdadm -C -n2 -l1 /dev/md0 /dev/sd{b,c}1 |
| Create second mirror (RAID 1) | mdadm -C -n2 -l1 /dev/md1 /dev/sd{d,e}1 |
| Stripe mirrors (RAID 0) | mdadm -C -n2 -l0 -c64 /dev/md2 /dev/md{0,1} |
| Check array state | cat /proc/mdstat |
| Create ext4 filesystem | mkfs.ext4 /dev/md2 |
| Mount the volume | mount /dev/md2 /hybrid_array |
| Inspect top-level array | mdadm --detail /dev/md2 |
Prepare four unused partitions or whole disks of similar usable size before running mdadm. A legacy MBR 0xFD partition type is not required for modern mdadm 1.x metadata; current systems normally identify and assemble arrays from MD superblocks. On GPT you may optionally mark partitions with the Linux RAID partition type for clarity, but mdadm does not depend on that flag to create a metadata-1.x array. Use parted or fdisk to partition the disks, then follow the steps below.
What is RAID 10 (1+0)?
RAID 10 — also written RAID 1+0 — mirrors data within each pair, then stripes across those mirrors. In this article that means a RAID 0 stripe across RAID 1 mirrors (nested RAID 1+0), not a single native MD RAID 10 personality.
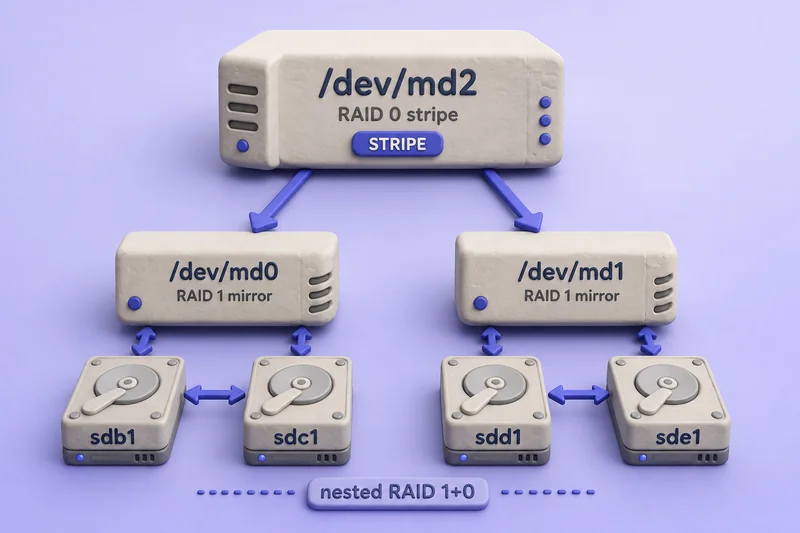
Read the figure top down: /dev/md2 is the RAID 0 stripe you format and mount; /dev/md0 and /dev/md1 are the underlying mirrors built from sdb1/sdc1 and sdd1/sde1. Writes are striped across the mirrors, and each mirror keeps a redundant copy on its partner disk.
Compared with RAID 0+1 (stripe first, mirror second), RAID 1+0 survives more realistic failures because a dead disk in one mirror does not take down the entire stripe partner. Usable capacity is half the raw disk total — four 2 GB partitions yield roughly 4 GB on /dev/md2.
Prerequisites: four member devices
A nested RAID 10 array needs at least four unused disks or partitions of the same or closely matched usable size. Larger members do not increase mirror capacity beyond the smaller partner. In the lab, sdb1, sdc1, sdd1, and sde1 were prepared on four data disks before mdadm ran.
Confirm the disks and partitions are visible:
lsblk[root@node1 ~]# lsblk
NAME MAJ:MIN RM SIZE RO TYPE MOUNTPOINT
sda 8:0 0 30G 0 disk
├─sda1 8:1 0 512M 0 part /boot
└─sda2 8:2 0 27.5G 0 part
├─centos-root 253:0 0 25.5G 0 lvm /
└─centos-swap 253:1 0 2G 0 lvm [SWAP]
sdb 8:16 0 2G 0 disk
└─sdb1 8:17 0 2G 0 part
sdc 8:32 0 2G 0 disk
└─sdc1 8:33 0 2G 0 part
sdd 8:48 0 2G 0 disk
└─sdd1 8:49 0 2G 0 part
sde 8:64 0 2G 0 disk
└─sde1 8:65 0 2G 0 part
sr0 11:0 1 1024M 0 romThe four data disks (sdb through sde) each expose one partition ready for RAID membership.
Step 1: Create the first RAID 1 mirror
Build /dev/md0 from sdb1 and sdc1:
mdadm -C -n2 -l1 /dev/md0 /dev/sd{b,c}1[root@node1 ~]# mdadm -C -n2 -l1 /dev/md0 /dev/sd{b,c}1
mdadm: Defaulting to version 1.2 metadata
mdadm: array /dev/md0 started.Step 2: Create the second RAID 1 mirror
Build /dev/md1 from sdd1 and sde1:
mdadm -C -n2 -l1 /dev/md1 /dev/sd{d,e}1[root@node1 ~]# mdadm -C -n2 -l1 /dev/md1 /dev/sd{d,e}1
mdadm: Defaulting to version 1.2 metadata
mdadm: array /dev/md1 started.The flags used above:
-C, --create     Create a new array.
-l, --level=     RAID level (1 = mirror, 0 = stripe, 10 = native RAID 10).
-n, --raid-devices=   Number of active devices in the array.
-c, --chunk=     Chunk size in kilobytes (used on the RAID 0 step below).
On the stripe step, the examples use -c64 for a 64 KiB chunk size. That is not a universal best value. Choose chunk size based on workload and filesystem alignment, or allow current mdadm defaults when you have no measured reason to override it.
Step 3: Verify the RAID 1 mirrors
After each mirror is created, mdadm starts a resync. Check progress with /proc/mdstat:
cat /proc/mdstat[root@node1 ~]# cat /proc/mdstat
Personalities : [raid1]
md1 : active raid1 sde1[1] sdd1[0]
2094080 blocks super 1.2 [2/2] [UU]
[=========>...........] resync = 48.3% (1012736/2094080) finish=0.0min speed=202547K/sec
md0 : active raid1 sdc1[1] sdb1[0]
2094080 blocks super 1.2 [2/2] [UU]
unused devices: <none>[2/2] [UU] means both expected RAID 1 members are present and active. In the sample above, md1 is still synchronizing because the resync = 48.3% line is present. Wait until the resync line disappears, or confirm a clean state with mdadm --detail, if you specifically need to verify synchronization has completed.
Step 4: Stripe the mirrors with RAID 0
Create /dev/md2 as a RAID 0 stripe across /dev/md0 and /dev/md1. This is the top-level hybrid RAID 10 volume:
mdadm -C -n2 -l0 -c64 /dev/md2 /dev/md{0,1}[root@node1 ~]# mdadm -C -n2 -l0 -c64 /dev/md2 /dev/md{0,1}
mdadm: /dev/md1 appears to contain an ext2fs file system
size=2094080K mtime=Mon Jun 10 16:31:37 2019
Continue creating array? y
mdadm: Defaulting to version 1.2 metadata
mdadm: array /dev/md2 started.If mdadm reports an existing filesystem or RAID signature, stop and confirm the device contains no data you need. The prompt above appeared because /dev/md1 had been used before. Do not answer y blindly on production hardware.
Inspect signatures with wipefs and remove stale ones only after verifying the device is safe to erase:
wipefs /dev/md1wipefs -a removes detectable filesystem and RAID signatures and is destructive — use it only when you are certain the device can be wiped.
Step 5: Verify the RAID 10 stack
The finished stack should show two RAID 1 mirrors and one RAID 0 stripe on top:
cat /proc/mdstat[root@node1 ~]# cat /proc/mdstat
Personalities : [raid1] [raid0]
md2 : active raid0 md1[1] md0[0]
4184064 blocks super 1.2 64k chunks
md1 : active raid1 sde1[1] sdd1[0]
2094080 blocks super 1.2 [2/2] [UU]
md0 : active raid1 sdc1[1] sdb1[0]
2094080 blocks super 1.2 [2/2] [UU]
unused devices: <none>/dev/md2 has roughly 4 GiB of usable capacity, combining the two ~2 GiB RAID 1 mirrors into the top-level RAID 0 stripe.
Inspect the top-level device with mdadm --detail:
mdadm --detail /dev/md2[root@node1 ~]# mdadm --detail /dev/md2
/dev/md2:
Version : 1.2
Creation Time : Fri Jun 14 14:07:15 2019
Raid Level : raid0
Array Size : 4184064 (3.99 GiB 4.28 GB)
Raid Devices : 2
Total Devices : 2
Persistence : Superblock is persistent
Update Time : Fri Jun 14 14:07:15 2019
State : clean
Active Devices : 2
Working Devices : 2
Failed Devices : 0
Spare Devices : 0
Chunk Size : 64K
Consistency Policy : none
Name : node1.golinuxcloud.com:2 (local to host node1.golinuxcloud.com)
UUID : c2ba009d:d077b4b5:eb28f342:e91ea39e
Events : 0
Number Major Minor RaidDevice State
0 9 0 0 active sync /dev/md0
1 9 1 1 active sync /dev/md1Raid Level : raid0 on /dev/md2 is expected — the top device is the stripe layer; the mirrors underneath remain RAID 1.
Step 6: Create a filesystem and mount point
Format the stripe device with ext4 — see mke2fs command for other filesystem options:
mkfs.ext4 /dev/md2[root@node1 ~]# mkfs.ext4 /dev/md2
mke2fs 1.42.9 (28-Dec-2013)
Filesystem label=
OS type: Linux
Block size=4096 (log=2)
Fragment size=4096 (log=2)
Stride=16 blocks, Stripe width=32 blocks
261632 inodes, 1046016 blocks
52300 blocks (5.00%) reserved for the super user
First data block=0
Maximum filesystem blocks=1071644672
32 block groups
32768 blocks per group, 32768 fragments per group
8176 inodes per group
Superblock backups stored on blocks:
32768, 98304, 163840, 229376, 294912, 819200, 884736
Allocating group tables: done
Writing inode tables: done
Creating journal (16384 blocks): done
Writing superblocks and filesystem accounting information: doneCreate a mount point for the new volume:
mkdir /hybrid_arrayMount /dev/md2 on the new directory:
mount /dev/md2 /hybrid_arrayConfirm the filesystem size and free space:
df -h /hybrid_array[root@node1 ~]# df -h /hybrid_array
Filesystem Size Used Avail Use% Mounted on
/dev/md2 3.9G 16M 3.7G 1% /hybrid_arraymount is temporary. Add the filesystem to /etc/fstab using its UUID, and ensure the MD array definitions are present in your distribution's mdadm configuration or initramfs so the nested arrays assemble before the mount is attempted. mdadm --detail --scan can generate prototype ARRAY entries for currently active arrays; review them before adding them to the appropriate mdadm.conf and rebuilding the initramfs where your distribution requires it — Debian and Ubuntu commonly use /etc/mdadm/mdadm.conf; RHEL-family systems integrate through initramfs and distro-specific mdadm config paths. See create filesystem and partition in Linux for fstab patterns.
Failure tolerance and controller layout
RAID 10 can survive a disk failure on each mirror as long as the failed disks are not partners in the same RAID 1 pair. If both disks on one mirror die, that half of the stripe is lost even when the other mirror is healthy.
Controller placement matters for nested arrays. A bad layout puts both disks of one mirror on the same I/O channel:
Controller A: sdb, sdd   →  Mirror 1 (both on one channel)
Controller B: sdc, sde   →  Mirror 2 (both on one channel)
A single controller failure degrades an entire mirror. A safer layout spreads mirror partners across channels using the same four data disks from this lab:
Controller A: sdb, sdd
Controller B: sdc, sde

Mirror 1: sdb + sdc
Mirror 2: sdd + sde
One controller failure then leaves each RAID 1 mirror degraded but still active, so both /dev/md0 and /dev/md1 remain available and the top-level /dev/md2 stripe can continue operating. The kernel MD layer supports degraded RAID 1 operation with one surviving member.
A nested design can also stripe more than two RAID 1 mirrors, and individual mirrors can include spare members. For new deployments beyond this four-disk lab, evaluate native mdadm --level=10, which represents the array as one MD RAID 10 device and supports RAID 10-specific layouts at various device counts — see the mdadm command cheat sheet.
References
- Linux kernel RAID wiki — RAID 10
- Linux
mdadm(8)manual — https://man7.org/linux/man-pages/man8/mdadm.8.html - Linux
md(4)manual — https://man7.org/linux/man-pages/man4/md.4.html
Summary
Software RAID 10 in Linux combines mirroring and striping for workloads that need both redundancy and I/O throughput. This guide built a nested RAID 1+0 stack: mdadm created two RAID 1 mirrors on four partitions, striped them into /dev/md2, formatted the result with ext4, and mounted it at /hybrid_array.
The /proc/mdstat output shows each layer: two mirrors under an active raid0 stripe. That nested view differs from native mdadm --level=10, which creates one MD RAID 10 device with its own layout algorithms. Both provide mirrored-and-striped redundancy, but they are different Linux MD implementations; four disks give the traditional layout, while native MD RAID 10 also supports other device counts.
Before creating arrays on production hardware, use four unused disks or partitions of closely matched size, spread mirror partners across controllers when possible, and add the filesystem to /etc/fstab by UUID while ensuring mdadm configuration or initramfs assembly covers all three MD devices. For day-to-day mdadm operations beyond this layout, use the mdadm command cheat sheet.
Frequently Asked Questions
What is the difference between RAID 10 and RAID 1+0?
RAID 10 is the combined level name. RAID 1+0 means mirrors first, then striping — two RAID 1 arrays joined by RAID 0. RAID 0+1 stripes first and mirrors second; 1+0 tolerates more realistic disk failures when failed disks are on different mirrors.
How many disks do I need for software RAID 10 in Linux?
A nested RAID 1+0 layout needs at least four unused disks or partitions of the same or closely matched usable size — two mirrors with two members each. Linux MD can also create a native RAID 10 array with --level=10; four disks give the traditional two-way mirrored-and-striped layout, while MD RAID 10 also supports other device counts and layouts.
Can I create RAID 10 with one mdadm command?
Yes. mdadm --create --level=10 --raid-devices=4 builds one native MD RAID 10 device with its own layout options. This guide uses a nested RAID 1+0 stack — RAID 1 mirrors first, then a RAID 0 stripe across them — because it maps clearly to how the layers appear in /proc/mdstat.
Why use RAID 10 instead of RAID 5?
RAID 10 combines mirroring and striping for higher read and write throughput with fast rebuilds, at the cost of fifty percent usable capacity. RAID 5 uses parity and needs fewer disks but rebuilds are slower and write latency is higher under failure.