| Tested on | RHEL 10.2 (Coughlan) |
|---|---|
| Package | openssh-clients 9.9p1-25.el10_2.x86_64openssh-server 9.9p1-25.el10_2.x86_64 |
| Applies to | Ubuntu, Debian, Kali Linux, Linux Mint, Pop!_OS, Raspberry Pi OS, elementary OS, Zorin OS, Parrot OS, MX Linux, RHEL, Rocky Linux, AlmaLinux, Oracle Linux, CentOS Stream, Fedora, Arch Linux |
| Privilege | Normal user for client keys and for the account's own ~/.ssh; sudo or root to restore SELinux contexts, read sshd -T, or edit another account's authorized_keys on the server |
| Scope | End-to-end public key setup: generate keys, install with ssh-copy-id or manually, connect with a specific identity, use ssh-agent, fix permissions and SELinux contexts, revoke a key, and troubleshoot publickey failures. Does not cover disabling password authentication or broad sshd hardening. |
Password prompts on every ssh login are workable in a lab but painful in production. Public key authentication lets the client prove identity with a key pair while sshd checks the matching public key in authorized_keys. This walkthrough uses a normal student account on VM1 (192.168.56.116) and VM2 (192.168.56.117) so the bootstrap path matches a fresh RHEL 10 install—log in as student on VM1 for the key-generation and ssh-copy-id steps below.
sshd hardening—that belongs in dedicated security guides.
SSH Key Quick Reference
Use this table for the commands covered in the walkthrough below.
| Task | Command |
|---|---|
| List client keys | ls -la ~/.ssh |
| Generate Ed25519 key | ssh-keygen -t ed25519 -f ~/.ssh/keyname -C "comment" |
| Show fingerprint | ssh-keygen -l -f ~/.ssh/keyname |
| Install key on server | ssh-copy-id -i ~/.ssh/keyname.pub user@host |
| Connect with one key | ssh -i ~/.ssh/keyname -o IdentitiesOnly=yes user@host |
| Verbose auth debug | ssh -v -i ~/.ssh/keyname -o IdentitiesOnly=yes user@host |
| Start agent | eval "$(ssh-agent -s)" |
| Load key | ssh-add ~/.ssh/keyname |
| List agent keys | ssh-add -l |
| Server permissions | .ssh 700; authorized_keys 600 |
| Restore SELinux labels | sudo restorecon -Rv ~/.ssh |
| Remove one key line | nl -ba ~/.ssh/authorized_keys then edit the numbered line |
How SSH Key Authentication Works
Public key authentication splits trust between a private key on the client and a matching public key line on the server. That model is different from SSH host-based authentication, which trusts a client machine host key instead of a per-user keypair. The flow below shows where each file participates; permissions and SELinux on the server can still block login even when the diagram path looks complete.
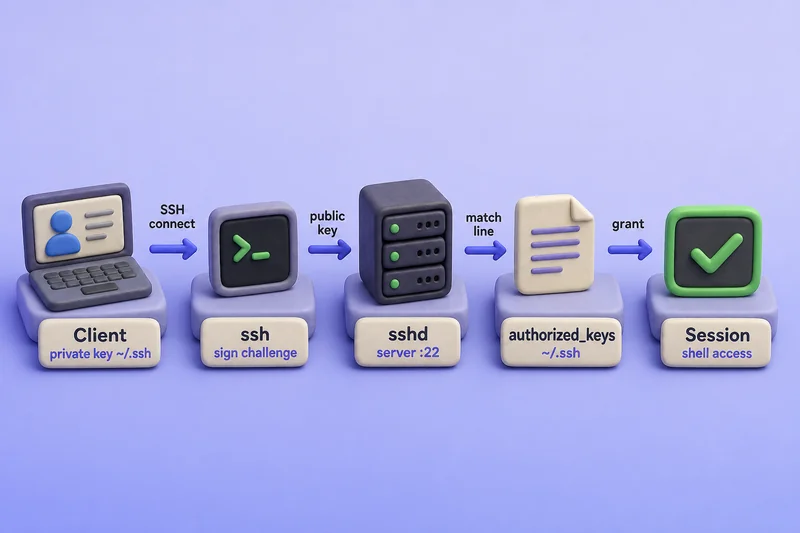
The client never sends the private key across the network—ssh signs a challenge locally and offers only the public key material. sshd accepts the login when a line in authorized_keys matches and file ownership, modes, and SELinux labels on the server are valid. Password authentication, if enabled, is a separate fallback after public key attempts fail.
- Private key — stays on the client (
~/.ssh/id_ed25519, custom path, or hardware token). Never copy it to the server. - Public key — one line in
authorized_keyson the server account you want to log in as. - Passwordless SSH — often means no password at the SSH prompt because the key has no passphrase. A passphrase on the private key is still key-based auth; you unlock the key locally with
ssh-addor a desktop agent.
For flag-level client options and verbose debugging, see the SSH command. Deeper ssh-keygen algorithm choices appear in the generate step below.
Check Existing SSH Keys
Before you generate a new pair, see what is already in ~/.ssh on the client account so you do not overwrite a key in use.
ls -la ~/.sshtotal 8
drwx------. 2 student student 6 Aug 7 22:45 .
drwx------. 5 student student 106 Aug 7 22:42 ..id_rsa and id_ed25519 are conventional default filenames for RSA and Ed25519 keys respectively. On RHEL 10, plain ssh-keygen without -t creates an RSA key pair; use ssh-keygen -t ed25519 when you explicitly want Ed25519.
If a default key already exists, pick a custom path for the lab key (for example ~/.ssh/lab_vm2_ed25519) instead of reusing the default filename. When ls does list an existing pair, identify it before you decide to reuse it—ssh-keygen -l -f ~/.ssh/id_ed25519 prints the fingerprint and comment of that key. On the empty ~/.ssh above there is nothing to inspect yet, so continue to key generation.
Generate a New SSH Key Pair
Create a dedicated Ed25519 key for the lab. Ed25519 is a practical choice on normal RHEL 10 installations: short keys, fast operations, and broad server support.
Ed25519 works well on normal RHEL 10 installations, but it is not FIPS-140-compliant and OpenSSH does not use Ed25519 keys when the system runs in FIPS mode. Use an algorithm permitted by your active RHEL cryptographic policy in that environment.
Run ssh-keygen interactively so the passphrase is not stored in shell history:
ssh-keygen -t ed25519 -f ~/.ssh/lab_vm2_ed25519 -C "vm1-to-vm2-lab"Generating public/private ed25519 key pair.
Enter passphrase for "/home/student/.ssh/lab_vm2_ed25519" (empty for no passphrase):
Enter same passphrase again:
Your identification has been saved in /home/student/.ssh/lab_vm2_ed25519
Your public key has been saved in /home/student/.ssh/lab_vm2_ed25519.pub
The key fingerprint is:
SHA256:hcbdbUodB+RNR4xHOw7PcQdugTPULG8VLU5LPnOGERw vm1-to-vm2-labChoose a non-empty passphrase when prompted—production-style keys should not use -N on the command line because that exposes the secret in shell history and process listings. For RSA legacy systems, ssh-keygen -t rsa -b 4096 still works; for algorithm trade-offs see generate SSH keys.
Confirm the new fingerprint:
ssh-keygen -l -f ~/.ssh/lab_vm2_ed25519256 SHA256:hcbdbUodB+RNR4xHOw7PcQdugTPULG8VLU5LPnOGERw vm1-to-vm2-lab (ED25519)Keep that value handy. Comparing the fingerprint on the client against the key installed on the server is how you confirm later which key sshd is actually matching.
Install the Public Key with ssh-copy-id
ssh-copy-id appends your public key to the remote authorized_keys file. It still needs one successful login with your current method—usually the account password—unless you already have another key that works.
On RHEL 10, PermitRootLogin defaults to prohibit-password, so root cannot bootstrap a new key with a root password through ssh-copy-id on a default install. Red Hat recommends normal-user login plus sudo for administration. The main lab below uses student@192.168.56.117; root key login is possible when policy allows, but password-based root bootstrap is not the default path.
Ensure student exists on both VMs with a known password for the first copy (create the account on VM2 if needed). From VM1 as student:
ssh-copy-id -i ~/.ssh/lab_vm2_ed25519.pub student@192.168.56.117/usr/bin/ssh-copy-id: INFO: Source of key(s) to be installed: "/home/student/.ssh/lab_vm2_ed25519.pub"
/usr/bin/ssh-copy-id: INFO: attempting to log in with the new key(s), to filter out any that are already installed
/usr/bin/ssh-copy-id: INFO: 1 key(s) remain to be installed -- if you are prompted now it is to install the new keys
Number of key(s) added: 1
Now try logging into the machine, with: "ssh -i /home/student/.ssh/lab_vm2_ed25519 'student@192.168.56.117'"Custom port uses the same pattern:
ssh-copy-id -i ~/.ssh/lab_vm2_ed25519.pub -p 22 student@192.168.56.117On VM2, confirm the line was appended under the target account:
ssh student@192.168.56.117 'wc -l ~/.ssh/authorized_keys; tail -1 ~/.ssh/authorized_keys'1 /home/student/.ssh/authorized_keys
ssh-ed25519 AAAAC3NzaC1lZDI1NTE5AAAAI... vm1-to-vm2-labTest authentication with the new private key. Because the key has a passphrase, load it into ssh-agent first (covered below) or enter the passphrase when ssh prompts:
eval "$(ssh-agent -s)"
ssh-add ~/.ssh/lab_vm2_ed25519Enter passphrase for /home/student/.ssh/lab_vm2_ed25519:ssh -i ~/.ssh/lab_vm2_ed25519 -o IdentitiesOnly=yes -o BatchMode=yes student@192.168.56.117 'echo login-ok'login-okSet VM2's FQDN with sudo hostnamectl set-hostname vm2.lab.example on the server if hostname -f still shows localhost—see Linux hostname resolution for naming between lab peers.
Install a Public Key Manually
Use manual install when ssh-copy-id is unavailable or you need tighter control over the exact line added.
Log in on the server as the account that will receive the key (here student on VM2) and prepare the files in that account's own home directory:
mkdir -p ~/.ssh
chmod 700 ~/.ssh
touch ~/.ssh/authorized_keys
chmod 600 ~/.ssh/authorized_keys
Because student creates these files itself, ownership is already student:student—no privileged ownership change is involved anywhere in this workflow.
Transfer the public key from the client with scp over an existing session:
scp ~/.ssh/lab_vm2_ed25519.pub student@192.168.56.117:/tmp/lab_vm2_ed25519.pubAppend without overwriting existing keys:
ssh student@192.168.56.117 'grep -qF "$(cat /tmp/lab_vm2_ed25519.pub)" ~/.ssh/authorized_keys || cat /tmp/lab_vm2_ed25519.pub >> ~/.ssh/authorized_keys'Verify ownership and modes, because sshd can reject SSH files or parent directories that are writable by group or other users:
ssh student@192.168.56.117 'stat -c "%U %G %a %n" ~/.ssh ~/.ssh/authorized_keys'student student 700 /home/student/.ssh
student student 600 /home/student/.ssh/authorized_keysNever paste the private key into authorized_keys. Only the single-line public key from the .pub file belongs there.
Connect Using a Specific Private Key
When several keys exist, ssh may offer the wrong identity first. Point at one key explicitly:
ssh -i ~/.ssh/lab_vm2_ed25519 -o IdentitiesOnly=yes student@192.168.56.117IdentitiesOnly yes limits the client to keys you specify (and keys already loaded in the agent when configured that way), which avoids "Too many authentication failures" when ssh tries every default key.
Add a client alias in ~/.ssh/config:
Host vm2-lab
    HostName 192.168.56.117
    User student
    IdentityFile ~/.ssh/lab_vm2_ed25519
IdentitiesOnly yeschmod 600 ~/.ssh/configThen connect with:
ssh vm2-labSee which identity the client offers with verbose output:
ssh -v -i ~/.ssh/lab_vm2_ed25519 -o IdentitiesOnly=yes -o BatchMode=yes student@192.168.56.117 exitdebug1: identity file /home/student/.ssh/lab_vm2_ed25519 type 3
debug1: Offering public key: /home/student/.ssh/lab_vm2_ed25519 ED25519 SHA256:hcbdbUodB+RNR4xHOw7PcQdugTPULG8VLU5LPnOGERw explicit agentThe Offering public key line should reference your lab key fingerprint before authentication succeeds.
Use ssh-agent for Passphrase-Protected Keys
ssh-agent holds decrypted private keys in memory so you do not type the passphrase on every connection.
Start an agent in the current shell and add the lab key:
eval "$(ssh-agent -s)"
ssh-add ~/.ssh/lab_vm2_ed25519Enter passphrase for /home/student/.ssh/lab_vm2_ed25519:ssh-add reads the passphrase from its controlling terminal. It does not accept the passphrase from stdin in a pipe—use interactive entry or a configured SSH_ASKPASS helper when you need scripted unlock; see pass an SSH password in a script for askpass and sshpass patterns on the SSH client.
List loaded keys:
ssh-add -l256 SHA256:hcbdbUodB+RNR4xHOw7PcQdugTPULG8VLU5LPnOGERw vm1-to-vm2-lab (ED25519)Remove one identity when you finish:
ssh-add -d ~/.ssh/lab_vm2_ed25519Identity removed: /home/student/.ssh/lab_vm2_ed25519 ED25519 (vm1-to-vm2-lab)Desktop environments often start an agent automatically; on servers, eval "$(ssh-agent -s)" per session is still common.
Correct SELinux Contexts
On RHEL with SELinux enforcing, correct Unix permissions are not enough if the label is wrong. sshd expects home SSH material under ssh_home_t.
Inspect contexts on the server:
ssh student@192.168.56.117 'getenforce; ls -ldZ /home/student/.ssh /home/student/.ssh/authorized_keys'Enforcing
drwx------. 2 student student system_u:object_r:ssh_home_t:s0 85 Aug 7 22:45 /home/student/.ssh
-rw-------. 1 student student system_u:object_r:ssh_home_t:s0 96 Aug 7 22:45 /home/student/.ssh/authorized_keysRestore labels after manual edits or restores from backup. Red Hat documents relabeling with restorecon as an administrative operation, so run it through sudo; ssh -t allocates a terminal in case sudo asks for a password:
ssh -t student@192.168.56.117 \
    'sudo restorecon -Rv /home/student/.ssh'
If student has no sudo rights on VM2, run restorecon -Rv /home/student/.ssh as root on VM2 instead.
Do not disable SELinux to fix key auth—fix the context and permissions instead.
Disable or Remove a Test Key
Keep another login path (password, second key, or console) before you remove the only key.
List authorized_keys with line numbers and match the fingerprint you verified earlier:
ssh student@192.168.56.117 'nl -ba ~/.ssh/authorized_keys' 1 ssh-ed25519 AAAAC3NzaC1lZDI1NTE5AAAAI... vm1-to-vm2-labOn the server, edit authorized_keys and remove only the line whose key material or fingerprint matches the key you intend to revoke. The trailing comment is not unique—do not rely on sed against the comment alone.
ssh -t student@192.168.56.117 'vi ~/.ssh/authorized_keys'ssh -t explicitly allocates a pseudo-terminal, which screen-oriented programs such as editors need. Without it vi has no usable terminal on the remote side.
Confirm revocation—the client should fail with publickey when BatchMode is on:
ssh -i ~/.ssh/lab_vm2_ed25519 -o IdentitiesOnly=yes -o BatchMode=yes student@192.168.56.117 truestudent@192.168.56.117: Permission denied (publickey,password).Reinstall with ssh-copy-id when you need the key again.
Troubleshoot SSH Key Authentication
Work through checks in order instead of regenerating keys immediately.
- Confirm the client offers the expected key (
ssh -v,ssh-add -l). - Confirm username, host, and port (
student@192.168.56.117, not another account's home). - Confirm
.sshis owned by the target user and not group/world writable. - Confirm
authorized_keysownership and mode (600on RHEL; not writable by group/others). - Match the full public key line—one line, no broken line breaks.
- On RHEL, check SELinux context (
ssh_home_t) and runsudo restorecon -Rv ~/.sshon the server if needed. - On the server, confirm effective
sshdsettings—not only lines in/etc/ssh/sshd_config:
sudo sshd -T | grep -iE 'pubkeyauthentication|authorizedkeysfile|strictmodes|permitrootlogin'pubkeyauthentication yes
authorizedkeysfile .ssh/authorized_keys
strictmodes yes
permitrootlogin prohibit-passwordFor normal-user public-key login, pubkeyauthentication yes is the key result. That output is the effective base configuration, including drop-in files RHEL layers in from /etc/ssh/sshd_config.d/.
If sshd_config contains Match rules, use sshd -T -C with the relevant connection parameters to see the settings that apply to that user and client. Plain sshd -T does not evaluate connection-specific Match conditions:
sudo sshd -T \
    -C user=student,addr=192.168.56.116,host=vm1.lab.example \
| grep -iE 'pubkeyauthentication|authorizedkeysfile'pubkeyauthentication yes
authorizedkeysfile .ssh/authorized_keys- Read client
-voutput and serverjournalctl -u sshdon the server.
| Symptom | Likely cause | Fix |
|---|---|---|
| Permission denied (publickey) | Wrong key, bad permissions, or missing line | ssh -i + IdentitiesOnly; fix modes; verify authorized_keys line |
| Too many authentication failures | Client offers too many keys | IdentitiesOnly yes or IdentitiesOnly yes in ssh_config |
| WARNING: UNPROTECTED PRIVATE KEY FILE | Private key mode too open | chmod 600 on the private key |
| Key copied to wrong account | Public key under another user's ~/.ssh |
Install line in the target user's authorized_keys |
| Wrong identity selected | Default keys tried first | ssh -i path or IdentityFile in config |
| Authentication refused: bad ownership or modes | .ssh or authorized_keys permissions |
chmod 700 ~/.ssh; chmod 600 authorized_keys; keep console access while testing |
Example server log after making .ssh group-writable during a deliberate lab break—on the server, journalctl shows the ownership refusal:
journalctl -u sshd --since "10 min ago" --no-pager | grep -i 'bad ownership' | tail -1Aug 07 22:12:59 vm2.lab.example sshd-session[21180]: Authentication refused: bad ownership or modes for directory /home/student/.sshBad private key permissions on the client produce a local warning before the connection attempt:
chmod 644 ~/.ssh/lab_vm2_ed25519
ssh -i ~/.ssh/lab_vm2_ed25519 -o IdentitiesOnly=yes -o BatchMode=yes student@127.0.0.1 true@@@@@@@@@@@@@@@@@@@@@@@@@@@@@@@@@@@@@@@@@@@@@@@@@@@@@@@@@@@
@ WARNING: UNPROTECTED PRIVATE KEY FILE! @
@@@@@@@@@@@@@@@@@@@@@@@@@@@@@@@@@@@@@@@@@@@@@@@@@@@@@@@@@@@
Permissions 0644 for '/home/student/.ssh/lab_vm2_ed25519' are too open.
It is required that your private key files are NOT accessible by others.
This private key will be ignored.
Load key "/home/student/.ssh/lab_vm2_ed25519": bad permissions
student@127.0.0.1: Permission denied (publickey,password).Restore chmod 600 on the private key after the test.
Two-VM SSH Key Lab
Use two VMs on the same L2 network. Confirm reachability with the ping command if a connection fails before you copy keys. This capture used VirtualBox host-only addresses — see SSH into a VirtualBox VM for adapter layout:
| VM | IP | FQDN |
|---|---|---|
| VM1 (client) | 192.168.56.116 |
vm1.lab.example |
| VM2 (server) | 192.168.56.117 |
vm2.lab.example |
On VM1 as student, generate the lab key, copy it to VM2, and test login as shown above. Configure the vm2-lab host alias in ~/.ssh/config for shorter commands.
To practice breakage and repair, keep a console or second SSH session open on VM2. World-writable .ssh causes sshd to ignore keys:
ssh student@192.168.56.117 'chmod 777 ~/.ssh'
ssh -i ~/.ssh/lab_vm2_ed25519 -o IdentitiesOnly=yes -o BatchMode=yes student@192.168.56.117 true
Expect Permission denied (publickey) even though the key line is still present.
Repair from the console or from an SSH session that was already open before you broke the permissions. A new connection using the rejected key will not authenticate until the permissions are repaired:
chmod 700 ~/.ssh
chmod 600 ~/.ssh/authorized_keys
sudo restorecon -Rv ~/.ssh
Re-test from VM1 with the lab key. Reboot VM2 and confirm key login still works after authorized_keys and contexts survive.
References
- sshd(8) — authorized_keys file format
- ssh(1)
- ssh-keygen(1)
- ssh-copy-id(1)
- Red Hat — Using secure communications with OpenSSH (RHEL 10)
Summary
SSH key authentication pairs a private key on the client with a public key line in the server's authorized_keys file. You generated an Ed25519 lab key as student on VM1, installed it on VM2 with ssh-copy-id, verified login with ssh -i and IdentitiesOnly, and used ssh-agent when the private key carried a passphrase.
The usual failure modes are permissions and context, not cryptography: group-writable .ssh, a too-open private key on the client, or the wrong account's authorized_keys file. SELinux ssh_home_t labels on RHEL belong in the same checklist as mode 700 and 600. Verify effective sshd settings with sshd -T rather than assuming a single line in sshd_config.
For algorithm choice and ssh-keygen depth, revisit the generate SSH keys section and its linked reference. For transfers and remote paths, use the scp and SSH command sections above. This guide intentionally stops before disabling password authentication—treat that as a separate hardening step once key login is reliable. When authorized_keys sprawl across many hosts becomes the problem, move to OpenSSH certificate authentication with a user CA instead of copying every public key by hand.
Frequently Asked Questions
What is the difference between passwordless SSH and SSH key authentication?
SSH key authentication proves identity with a key pair instead of a password at login time. People call it passwordless when the private key has no passphrase, but a passphrase-protected key is still key-based auth—the passphrase unlocks the private key locally.
Why does ssh work but ssh-copy-id asks for a password?
ssh-copy-id must authenticate once with your current method—usually a password—to append the public key to the server authorized_keys file. After the key is installed, ssh can use publickey authentication.
What permissions does authorized_keys need on RHEL?
On RHEL, use mode 700 for ~/.ssh and 600 for authorized_keys. With StrictModes enabled, SSH key authentication can be rejected when the home directory, .ssh, or authorized_keys is writable by users other than the owner.
Should I copy my private key to the server?
No. Only the public key (.pub file or a single line from it) goes on the server. The private key stays on the client and must remain readable only by the owner.
Why Permission denied (publickey) after copying the key?
Check that the client offers the right private key, the public key line on the server matches, file ownership and modes on .ssh and authorized_keys are correct, SELinux contexts are ssh_home_t where applicable, and effective sshd settings show pubkeyauthentication yes from sshd -T.