| Tested on | SoftMaker PlanMaker on Windows |
|---|---|
| Package | SoftMaker Office PlanMaker (licensed desktop spreadsheet) |
| Applies to | Windows and Linux installations of SoftMaker Office PlanMaker where Input validation and form objects are available |
| Privilege | Normal user account with PlanMaker installed and a workbook open |
| Scope | In-cell dropdown lists with input validation and interactive form object dropdown controls. Does not cover Excel file compatibility, VBA macros, or FreeOffice PlanMaker input validation. |
A dropdown list in PlanMaker limits what someone can pick in a cell. You can build that list with input validation when the value should live inside the cell, or with a form object dropdown when you want a separate control that reads from a sheet range.
Quick reference: dropdown lists in PlanMaker
| Goal | Where to start | Jump to |
|---|---|---|
| In-cell dropdown with validation rules | Data → Input validation → List entries | Method 1 |
| Separate dropdown control on the sheet | Insert → Form object → Dropdown | Method 2 |
Choose the right dropdown method
| You need | Use |
|---|---|
| The selected value stored directly in the data cell | Input validation with Use dropdown |
| A visible control that reads list items from another range | Form object dropdown |
| Optional input and error messages when the cell is selected | Input validation message tabs |
| A result cell that shows only the chosen list item | Form object Result cell field |
Input validation is the everyday choice for order forms, status columns, and any sheet where the cell itself should hold the answer. Form objects fit dashboards or templates where the dropdown should float above the grid and write into a different cell.
Method 1: Create a dropdown with input validation
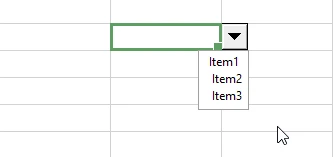
Input validation restricts a cell to values you define ahead of time. When you allow list entries and enable Use dropdown, PlanMaker shows an arrow in the cell and opens your list when someone clicks it.
Select the cell where the dropdown should appear.
Open the Data tab on the ribbon and click Input validation.

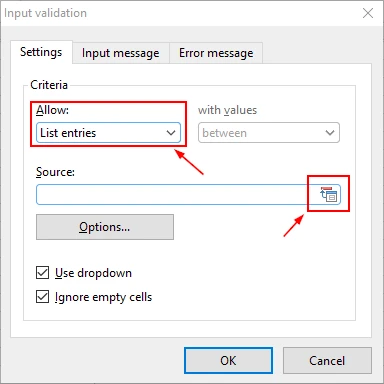
In the Input validation dialog, open the Settings tab. Set Allow to List entries, then fill Source using one of these patterns:
- Type a comma-separated list, for example
Item1, Item2, Item3. - Enter a range reference such as
=A1:A20or=C4:C9. - Click the range picker beside Source and select the cells that already contain your list items.
Keep Use dropdown checked so the arrow appears in the cell.
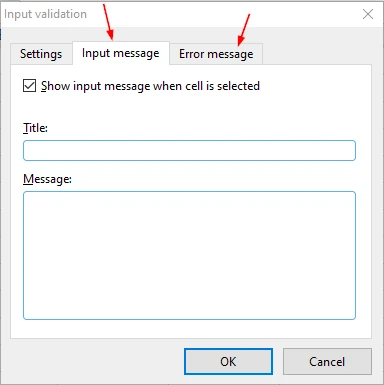
Switch to the Input message and Error message tabs when you want helper text on selection or a custom warning when someone types a value outside the list.
Click OK. PlanMaker adds the dropdown arrow to the cell you selected in the first step.
SoftMaker's current documentation also lists Review → Input validation on some PlanMaker versions. If your ribbon matches the screenshot above, use the Data tab path shown here.
Method 2: Create a dropdown with a form object
Form object dropdowns are separate controls you place on the sheet. They are useful when the list should stay in one range while the chosen value appears somewhere else.
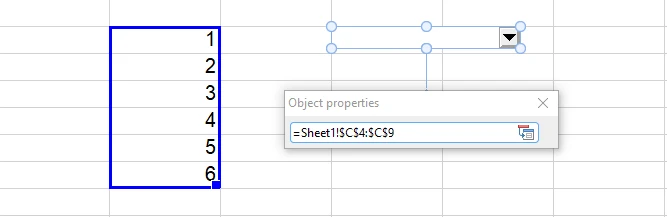
Type the list items in a column on the sheet first. In the example figures, the source list is the numbers 1 through 6.
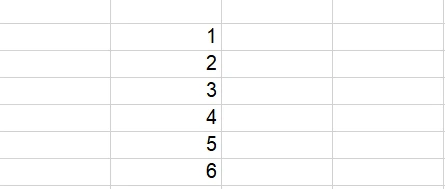
Go to the Insert tab, open Form object, and choose Dropdown.
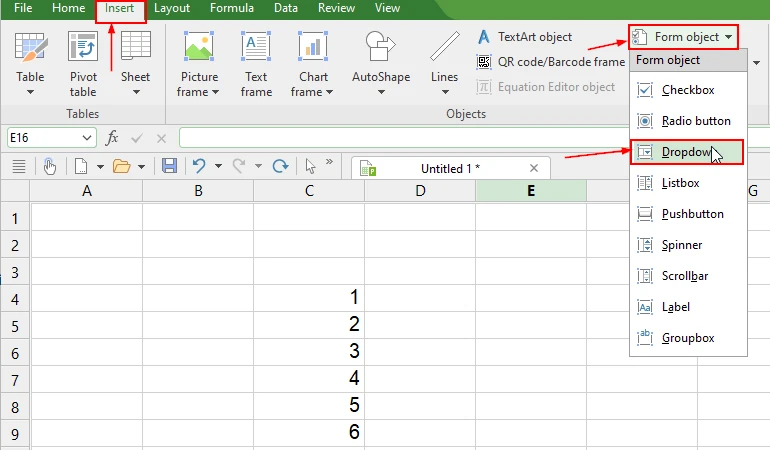
PlanMaker inserts the dropdown control on the active sheet.
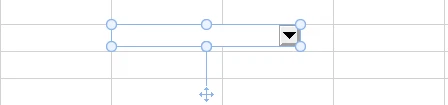
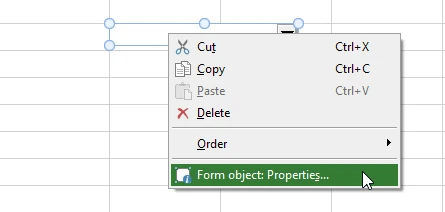
Right-click the new dropdown and choose Form object: Properties.
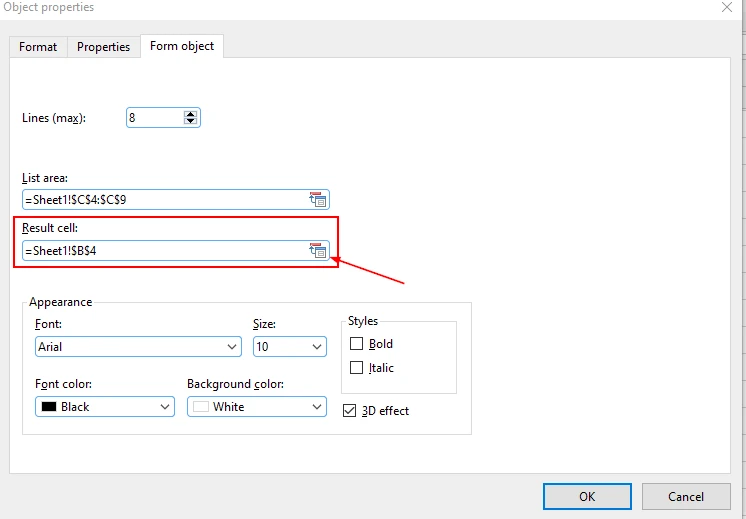
On the Form object tab, set List area to the cell range that contains your items. You can type a reference or use the range picker.
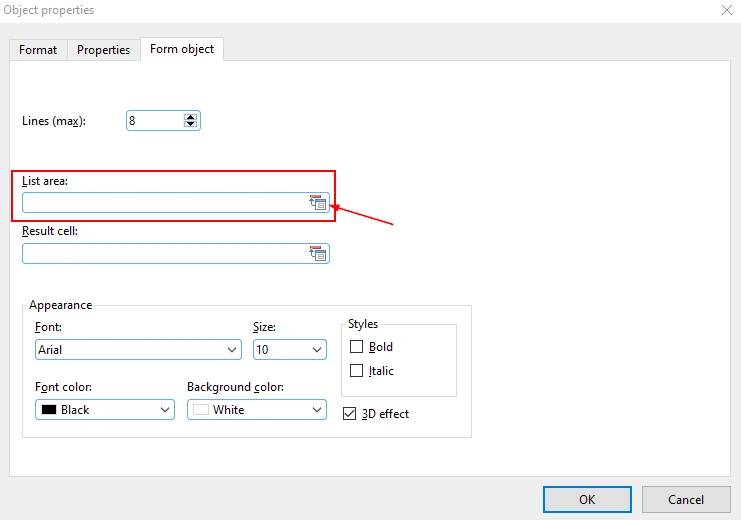
Use the picker to select the source cells on the sheet. In this example the list area resolves to =Sheet1!$C$4:$C$9.
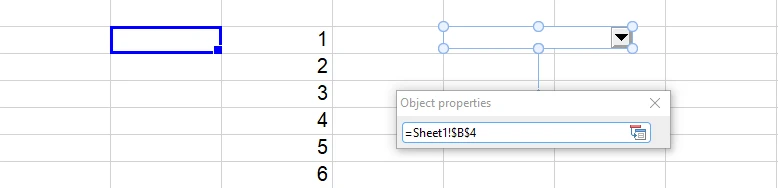
Optionally set Result cell to the address where PlanMaker should write the selected item. Pick a different cell if you do not want the value stored inside the control itself.
When both fields are set, the dialog shows the list area and result cell together. Adjust font, colors, and 3D effect under Appearance if needed, then click OK.
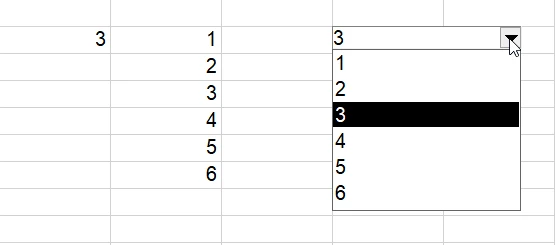
Open the dropdown on the sheet to confirm it lists every source value and copies the selection into the result cell.
Troubleshooting
| Symptom | Likely cause | Fix |
|---|---|---|
| No Input validation command in the ribbon | FreeOffice edition or older build | Confirm SoftMaker Office licensing; try Review → Input validation on newer builds |
| Dropdown arrow missing after validation | Use dropdown unchecked | Reopen Input validation, enable Use dropdown under List entries, click OK |
| Form object list is empty | List area reference wrong or blank | Open Form object: Properties and set List area to the correct =Sheet!$C$4:$C$9 style reference |
| Selected item does not appear where expected | Result cell not configured | Set Result cell on the Form object tab, or use input validation when the value should live in the same cell |
| Typed value rejected | Value not in the allowed list | Add the value to the source range or update the comma-separated Source list |
References
- SoftMaker PlanMaker — Input validation settings — https://help.softmaker.com/planmaker2024/en/settings_for_input_validation.html
- SoftMaker Office PlanMaker product page — https://www.softmaker.com/en/softmaker-office-planmaker
Summary
PlanMaker gives you two practical ways to add a dropdown list. Method 1 uses input validation when the cell itself should hold the allowed values: choose List entries, define Source, keep Use dropdown enabled, and optionally add input or error messages. Method 2 uses form object dropdowns when the list stays in one range and the chosen value should land in another cell through the List area and Result cell fields.
Start with Method 1 for simple data entry sheets. Reach for Method 2 when you need a separate control on top of the grid. Confirm your edition includes Input validation before you rely on Method 1 in production workbooks.
Frequently Asked Questions
What is the easiest way to add a dropdown list in PlanMaker?
Use input validation with Allow set to List entries. Pick the target cell, open Input validation, enter a comma-separated list or a range reference in Source, keep Use dropdown enabled, and click OK.
Can I link a dropdown to cells that already contain my list items?
Yes. In the input validation dialog, set Source to a range such as =C4:C9 or click the range picker and select the cells on the sheet. The dropdown shows whatever values are in that range.
What is the difference between input validation and a form object dropdown?
Input validation stores the selected value inside the cell and is best for data entry rules. A form object dropdown is a separate control on the sheet; you point its list area at a range and optionally write the chosen value into a result cell.
Does FreeOffice PlanMaker support input validation dropdowns?
No. SoftMaker documents input validation as a feature of the paid SoftMaker Office PlanMaker product, not FreeOffice PlanMaker. Form object controls may still be available depending on your edition.