
XFCE is a lightweight and fast desktop environment designed for Unix-like operating systems such as Linux. It is widely used on Ubuntu systems where performance and simplicity are preferred over heavy graphical environments.
Compared to desktop environments like GNOME or KDE Plasma, XFCE consumes significantly fewer system resources while still providing a complete graphical desktop with panels, application menus, workspace management, and customization options.
Because of its efficiency, XFCE is commonly installed on older hardware, virtual machines, cloud servers, and systems where users want a responsive desktop experience without unnecessary overhead.
Quick Reference: Install XFCE on Ubuntu
| Scenario | Command |
|---|---|
| Update package repository | sudo apt update |
| Install minimal XFCE desktop | sudo apt install xfce4 |
| Install XFCE with plugins and utilities | sudo apt install xfce4 xfce4-goodies |
| Install full Xubuntu desktop | sudo apt install xubuntu-desktop |
| Install XFCE on Ubuntu Server | sudo apt install xfce4 xfce4-goodies xorg |
| Install LightDM display manager | sudo apt install lightdm |
| Start XFCE manually | startxfce4 |
| Restart XFCE panel | xfce4-panel -r |
| Reset XFCE configuration | rm -rf ~/.config/xfce4 |
| Remove XFCE | sudo apt purge xfce4 xfce4-goodies |
| Remove unused dependencies | sudo apt autoremove |
XFCE vs GNOME on Ubuntu
Many Ubuntu systems use the GNOME desktop environment by default. However, XFCE is often preferred for its lightweight performance and lower resource usage.
| Feature | XFCE | GNOME |
|---|---|---|
| RAM Usage | Low | Medium to High |
| CPU Usage | Low | Medium |
| Customization | High | Moderate |
| Default Ubuntu Desktop | No | Yes |
| Best For | Older hardware and virtual machines | Modern desktop systems |
If your system has limited memory or CPU resources, XFCE provides a faster and more responsive desktop experience.
What is the XFCE Desktop Environment
XFCE is a lightweight and efficient desktop environment designed for Unix-like operating systems such as Linux. It provides a traditional desktop layout with a panel, application menu, window manager, and file manager, while consuming significantly fewer system resources compared to heavier desktop environments like GNOME or KDE Plasma.
Because of its low memory and CPU usage, XFCE is widely used on older computers, virtual machines, and cloud-based Linux systems where performance and responsiveness are important. Despite being lightweight, XFCE still offers essential desktop functionality such as workspace management, customizable panels, themes, and plugin support.
Ubuntu users often install XFCE to create a faster and more minimal desktop experience while maintaining the flexibility to customize their interface according to their needs.
Choose XFCE Installation Method
There are multiple ways to install XFCE on Ubuntu depending on your requirements.
| Method | Recommended For |
|---|---|
Minimal XFCE (xfce4) |
Lightweight systems and virtual machines |
XFCE with utilities (xfce4-goodies) |
Most desktop users |
Full Xubuntu desktop (xubuntu-desktop) |
Complete XFCE experience |
| Ubuntu Server XFCE | Servers needing a graphical interface |
Choose the method that best matches your system setup.
Prerequisites
Before installing XFCE on Ubuntu, make sure the system meets a few basic requirements to ensure a smooth installation process.
- Ensure the system has an active internet connection to download packages from Ubuntu repositories.
- Verify that sufficient disk space is available for the installation.
- Make sure the package repository information is updated before installing new software.
Having these prerequisites in place helps prevent installation failures and ensures that the latest package versions are installed.
Steps to Install XFCE on Ubuntu
After choosing the preferred XFCE installation method and verifying the prerequisites, you can proceed with the installation steps below. The following example installs the minimal XFCE desktop environment, which provides the core desktop components.
Step 1: Update Ubuntu Package Repository
First update the package repository so Ubuntu can fetch the latest available software versions.
sudo apt update
This ensures the system installs the newest versions of XFCE packages available in the repository.
Step 2: Install XFCE Desktop Environment
Next install the core XFCE desktop environment. This installs the basic XFCE components including the window manager, panel, settings manager, and desktop utilities.
sudo apt install xfce4
During installation Ubuntu may prompt you to choose a display manager such as LightDM or GDM3.
- LightDM is lightweight and commonly used with XFCE.
- GDM3 is the default display manager used by GNOME.
If prompted, select LightDM for better performance with XFCE.
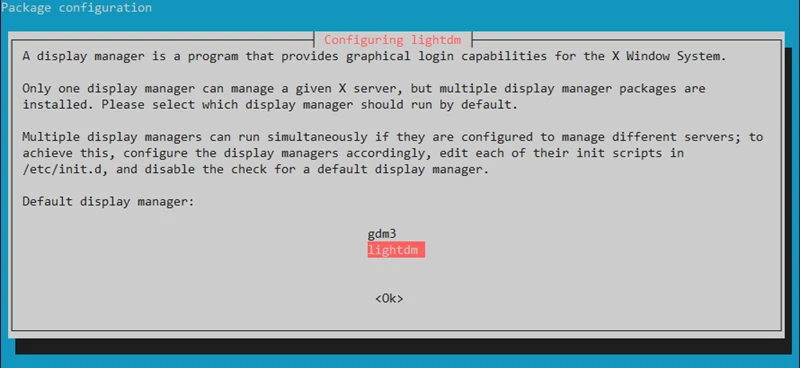
If the installer does not prompt you, it means a display manager is already configured on your system and no action is required.
Configure Display Manager Manually (If Prompt Does Not Appear)
If the installation does not ask you to choose a display manager, you can configure it manually.
First install LightDM if it is not already installed.
sudo apt install lightdm
Then select the default display manager.
sudo dpkg-reconfigure lightdm
Step 3: Install Additional XFCE Utilities (Optional)
The xfce4-goodies package provides additional plugins, panel extensions, and useful desktop utilities that enhance the XFCE experience.
These tools include extra panel widgets, system monitoring plugins, and additional configuration utilities that help improve desktop functionality.
You can install these optional utilities using the following command:
sudo apt install xfce4-goodies
Although this step is optional, many users install these utilities to get a more feature-rich XFCE desktop environment.
Step 4: Log Out or Reboot the System
After the installation completes, log out of your current session or reboot the system so the login screen can detect the newly installed desktop environment.
sudo reboot
Restarting ensures the display manager loads the newly installed desktop environment.
Step 5: Select XFCE Desktop from Login Screen
Once the system restarts or the user logs out, the login screen will appear. Before entering your password, locate the desktop session selector (usually shown as a gear icon).
From the list of available desktop environments, the login screen may display two session options:
- XFCE Session – uses the traditional Xorg display server
- XFCE Session (Wayland) – runs XFCE using the Wayland display protocol
In most cases, it is recommended to use XFCE Session (Xorg) because Wayland support for XFCE is still experimental on some Ubuntu versions.
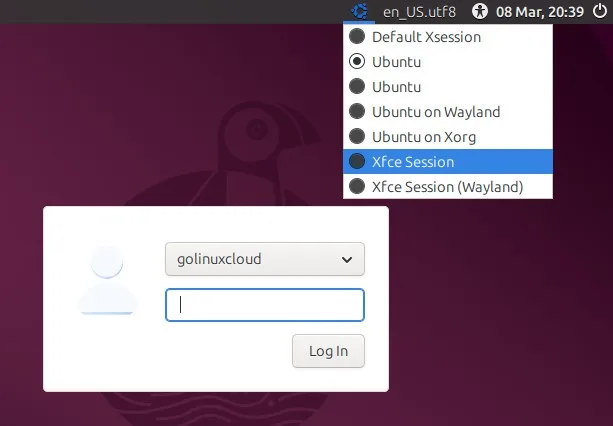
If you encounter graphical issues, simply log out and choose the other session type.
- Select XFCE Session
- Enter your password
- Log in to start using the XFCE desktop
After logging in, the system will load the XFCE desktop environment where you can begin customizing your panels, themes, and desktop layout.
Verify XFCE Desktop Installation
After logging into the system with the XFCE session selected, you should see the XFCE desktop interface with its default panel, application menu, and desktop layout. This confirms that the installation was successful.
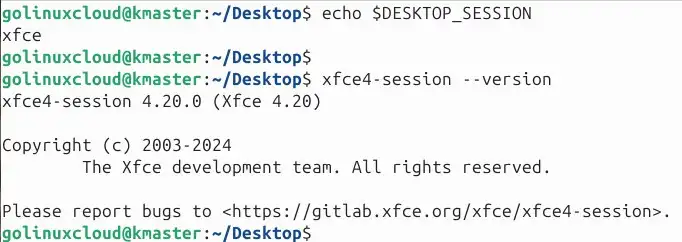
To verify that XFCE is running, you can also check the session environment from the graphical terminal.
echo $DESKTOP_SESSION
If XFCE is active, the output typically shows xfce or xfce4.
You can also confirm the XFCE version installed on your system.
xfce4-session --version
Once the desktop loads correctly and the panel, menu, and settings manager are accessible, the XFCE environment is fully operational.
Customize XFCE Desktop
Change Themes and Icons
XFCE supports different themes, icon sets, and window styles. To change these settings, open the Appearance tool from the XFCE settings manager.
Navigate to:
Applications Menu → Settings → Appearance
Here you can modify:
- Desktop theme
- Icon theme
- Fonts
- Window styles
This allows you to personalize the visual appearance of your desktop environment.
Configure XFCE Panels
The XFCE panel controls the application menu, system tray, workspace switcher, and other desktop widgets. You can modify its layout, position, and contents.
To configure the panel:
- Right-click the panel
- Select Panel → Panel Preferences
From this interface you can:
- Move the panel to different screen edges
- Adjust panel size
- Add or remove widgets
- Enable auto-hide
Panels can also be added or removed entirely to create multi-panel layouts.
Install XFCE Plugins
XFCE supports many panel plugins that extend desktop functionality. These plugins allow you to add useful tools directly to the panel.
Some commonly used plugins include:
- CPU and memory monitors
- Weather widgets
- Network monitors
- Application launchers
You can search for available XFCE plugins using:
apt search xfce4
To install a plugin, use the apt package manager.
sudo apt install xfce4-weather-plugin
After installation, the plugin can be added from the Panel Preferences → Items → Add menu.
Troubleshoot XFCE Installation
XFCE Not Showing in Login Screen
If XFCE does not appear in the desktop environment selection menu on the login screen, it may indicate that the session files were not registered correctly.
First verify that the XFCE packages are installed.
dpkg -l | grep xfce
If the packages are missing, reinstall XFCE.
sudo apt install xfce4
After reinstalling, log out and check the login screen again.
Black Screen After Login
A black screen after selecting XFCE is usually caused by corrupted user configuration files or session conflicts.
You can reset the XFCE configuration directory to regenerate default settings.
mv ~/.config/xfce4 ~/.config/xfce4_backup
Log out and log in again. XFCE will create a fresh configuration directory.
Reset XFCE Settings
If the desktop environment behaves incorrectly or panels are missing, resetting the configuration may resolve the issue.
Remove the existing XFCE configuration directory.
rm -rf ~/.config/xfce4
When you log in again, XFCE will automatically recreate the default configuration.
Remove XFCE from Ubuntu
If you no longer need XFCE, you can remove the installed packages and return to the default desktop environment such as GNOME.
Remove XFCE Packages
Use the following command to remove the XFCE desktop environment.
sudo apt purge xfce4 xfce4-goodies
This removes the installed XFCE packages from the system.
Clean Unused Dependencies
After uninstalling XFCE, some dependencies may remain on the system. These can be removed using the autoremove command.
sudo apt autoremove
This cleans unused packages that were installed as dependencies during the XFCE installation.
Frequently Asked Questions
1. How do I install XFCE on Ubuntu?
2. What is the difference between xfce4 and xubuntu-desktop?
3. Can I install XFCE on Ubuntu Server?
4. How do I switch from GNOME to XFCE in Ubuntu?
5. How do I remove XFCE from Ubuntu?
Summary
XFCE is a lightweight and efficient desktop environment that provides a fast and stable graphical interface for Ubuntu systems. It is particularly useful on older hardware, virtual machines, and systems where minimizing resource usage is important while still maintaining a full desktop experience.
In this guide, we explored how to install the XFCE desktop environment on Ubuntu using the xfce4 package and optionally enhance it with additional utilities using xfce4-goodies. We also covered how to select the XFCE session from the login screen, verify that the desktop environment is working correctly, customize panels and themes, and troubleshoot common issues that may occur after installation.
XFCE offers a flexible desktop environment that can be easily tailored to user preferences through themes, plugins, and panel configuration. Whether you want a lightweight alternative to GNOME or a responsive desktop for limited-resource systems, XFCE remains one of the most reliable options available in the Linux ecosystem.
Official Documentation
If you want to explore XFCE further or learn about advanced configuration options, the following official resources provide detailed documentation and guides.