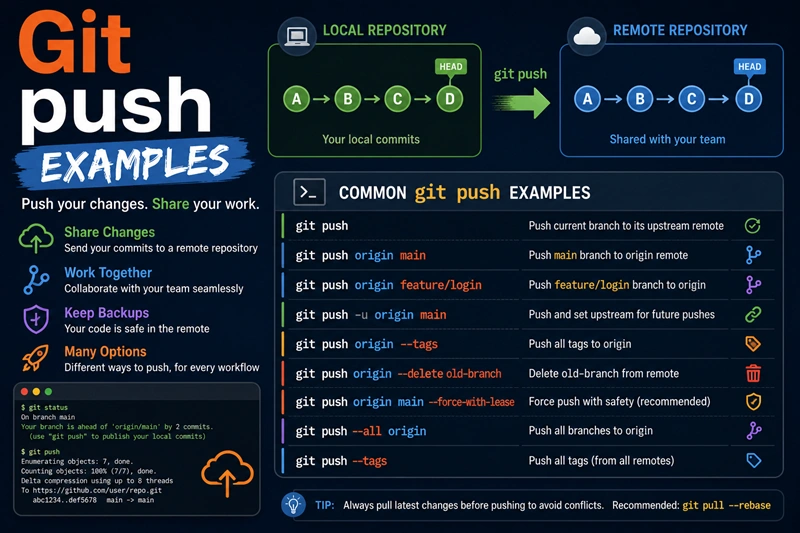
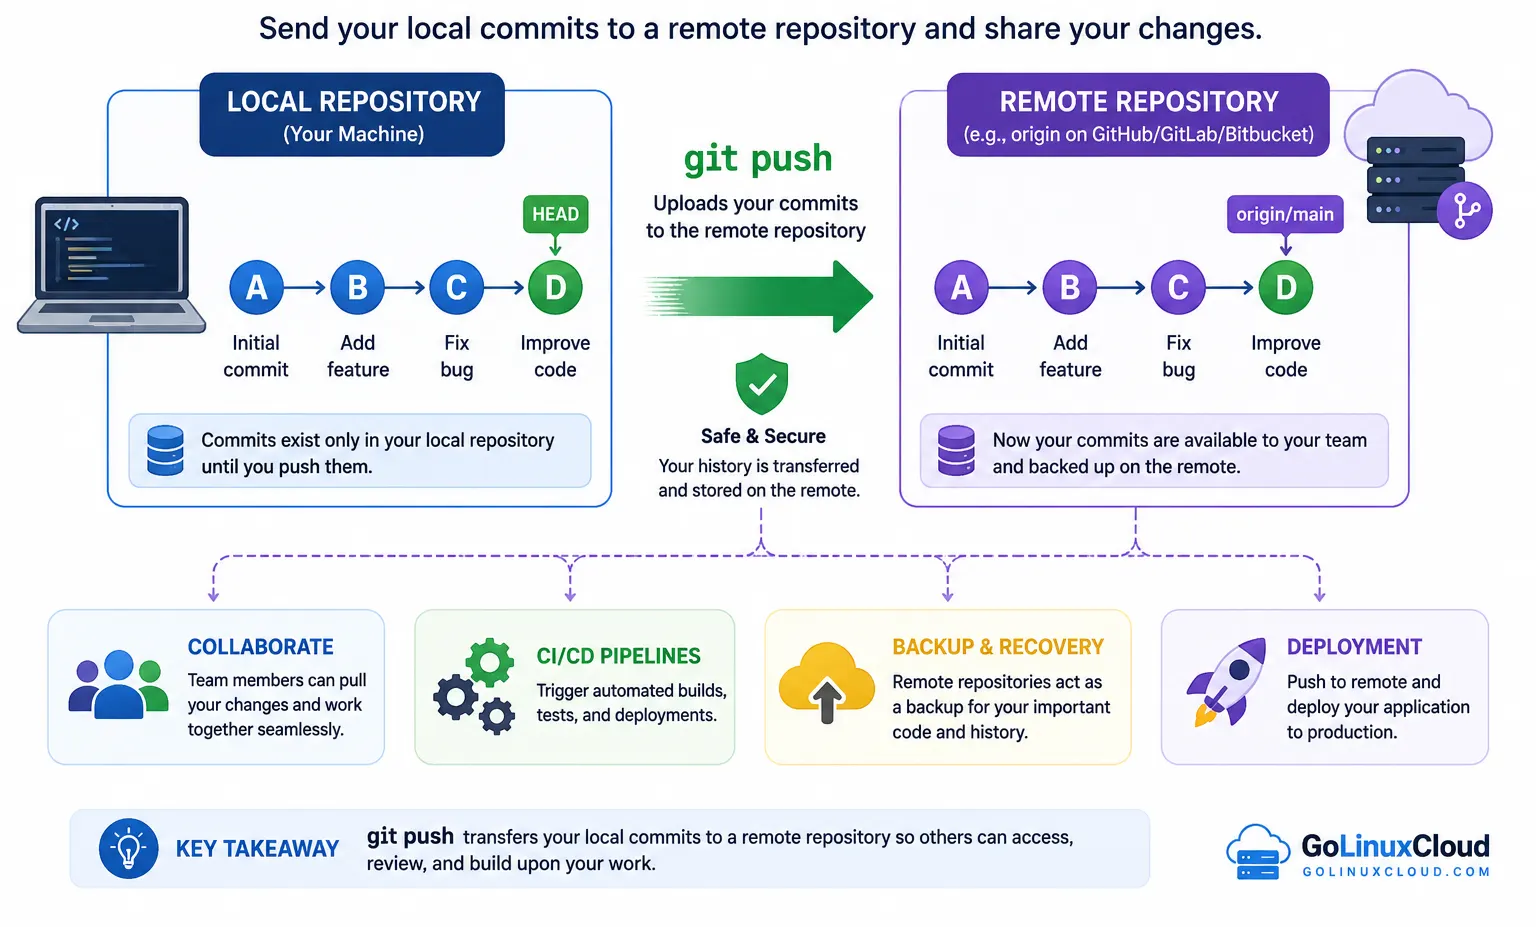
git push is used to upload your local commits to a remote repository, making your changes available to others. It updates remote branches, tags, or refs based on your local repository state. Understanding how and when to use git push is essential for safe and efficient collaboration in Git.
git push command - Quick Cheat Sheet
| Task | Command |
|---|---|
| Push current branch to remote | git push |
| Push specific branch to origin | git push origin branch-name |
| Push current branch to origin | git push origin HEAD |
| Push local branch to different remote branch | git push origin local-branch:remote-branch |
| Push and set upstream (first time) | git push -u origin branch-name |
| Set upstream for existing branch | git push --set-upstream origin branch-name |
| Push all branches | git push --all |
| Push all tags | git push --tags |
| Push specific tag | git push origin tag-name |
| Delete remote branch | git push origin --delete branch-name |
| Delete remote tag | git push origin :refs/tags/tag-name |
| Delete remote branch (old syntax) | git push origin :branch-name |
| Dry run (simulate push) | git push --dry-run |
| Push and prune deleted branches | git push --prune |
| Mirror entire repository | git push --mirror |
| Push to specific remote | git push <remote> |
| Push multiple refs | git push origin branch1 branch2 |
| Push all matching branches | git push origin : |
| Push with verbose output | git push --verbose |
| Push quietly (no output) | git push --quiet |
| Push using SSH remote | git push git@github.com:user/repo.git |
| Push to upstream branch | git push @{u} |
| Push and follow tags | git push --follow-tags |
| Push signed commits | git push --signed |
| Push without verification hooks | git push --no-verify |
| Push with progress output | git push --progress |
| Push using specific refspec | git push origin refs/heads/dev:refs/heads/prod |
| Push HEAD to remote branch | git push origin HEAD:branch-name |
git push Syntax and Basic Usage
git push command syntax explained
The basic syntax of git push is:
git push [options] <remote> <branch><remote>: Name of the remote repository (commonlyorigin)<branch>: The branch you want to push (e.g.,main,dev)
Example:
git push origin mainThis command pushes your local main branch to the remote repository named origin.
Understanding remote and origin in git
In Git, a remote refers to a version of your repository hosted elsewhere (such as GitHub, GitLab, or Bitbucket).
originis the default name given to the remote repository when you clone a project.- You can have multiple remotes (e.g.,
origin,upstream).
To view configured remotes:
git remote -vTo add a new remote:
git remote add origin https://github.com/user/repo.gitSo when you run:
git push origin mainYou are pushing changes from your local main branch to the main branch of the remote repository named origin.
Default behavior when branch is not specified
If you run:
git pushGit behaves based on your configuration:
- If an upstream branch is already set, Git pushes the current branch to its tracked remote branch.
- If no upstream is set, Git will show an error and ask you to specify the remote and branch.
Example error:
fatal: The current branch dev has no upstream branch.To fix this, set upstream:
git push -u origin devAfter this, you can simply use:
git pushGit will automatically push to the configured upstream branch.
Push Local Changes to Remote Repository
The most common use of the git push command is to upload your local commits to a remote repository so others can access your changes. In simple terms, git push takes everything you have committed locally and updates the remote branch with those changes.
Before using git push, make sure you have already added and committed your changes:
git add .
git commit -m "added new changes"
Now you can push your code to the remote repository.
The most widely used command is:
git push origin mainorigin→ remote repository namemain→ branch name
This command pushes your local main branch to the remote main branch. This is one of the most searched patterns for git push example, git push origin, and git push command example.
Push current branch without specifying branch name
If your branch is already linked to a remote (upstream is set), you can simply run:
git pushGit will automatically push the current branch to its corresponding remote branch. This is commonly used in daily workflows and answers queries like how to git push and git push usage.
Push a new branch to remote
If you are working on a new branch and want to push it to the remote repository:
git push -u origin feature-branchThe -u (or --set-upstream) option sets the upstream tracking. After this, you can just use git push without specifying the branch again.
Push local branch to a different remote branch
You can also push your local branch to a differently named branch on the remote:
git push origin local-branch:remote-branchExample:
git push origin dev:productionThis pushes your local dev branch to the remote production branch.
Push changes to origin explicitly
Another commonly used variation is:
git push origin HEADThis pushes the current branch (whatever you are working on) to the corresponding branch in the remote repository. It is useful when you don’t want to type the branch name manually.
First Time Push (Upstream Tracking)
When you push a branch for the first time, Git does not automatically know which remote branch it should track. This is where upstream tracking comes into play. Setting an upstream allows you to use simple commands like git push and git pull without specifying the remote and branch every time.
The most common command for first-time push is:
git push -u origin branch-nameExample:
git push -u origin feature-login-u(or--set-upstream) → links your local branch with the remote branchorigin→ remote repositoryfeature-login→ branch name
After running this once, Git remembers the relationship between your local and remote branch. Now you can simply use:
git pushTo verify if upstream is set correctly:
git branch -vvYou will see your branch mapped to something like origin/feature-login.
If you forgot to set upstream during the first push, Git will show an error like:
fatal: The current branch feature-login has no upstream branch.You can fix it using:
git push --set-upstream origin feature-loginSetting upstream tracking is important for efficient workflows, especially when working with multiple branches or collaborating with teams.
Force Push (Overwriting Remote History)
Sometimes you need to overwrite remote history after rewriting commits with git rebase or git commit --amend. In those cases a normal push is rejected and you must force push. The safest way is:
git push --force-with-leaseThis only overwrites the remote branch if it has not changed since your last fetch, protecting your teammates' work. Force pushing is a destructive operation with several important scenarios (remote branch, origin master/main, after rebase, recovering from a bad push), so it has its own complete walkthrough.
Read the full guide: Git Push Force Explained: --force vs --force-with-lease
Working with Branches Using git push
Push new branch to remote
When working with multiple branches, git push helps you create, update, and remove branches on the remote repository.
To push a new branch to remote:
git push -u origin feature-branchThis creates the branch on the remote and sets upstream tracking so future pushes can be done using git push.
Delete remote branch using git push
To delete a remote branch:
git push origin --delete feature-branchThis removes the specified branch from the remote repository.
Older syntax (still valid):
git push origin :feature-branchRename and push branch
To rename a branch and push it:
git branch -m old-name new-name
git push origin new-name
git push origin --delete old-name
This sequence renames the local branch, pushes the new branch to remote, and deletes the old branch from the remote.
These operations are commonly used when managing feature branches, cleaning up old branches, or maintaining structured workflows.
Push Tags in Git
git push tag example
Git tags are used to mark important points in history, such as releases. You can push tags to a remote repository using git push.
To push a specific tag:
git push origin v1.0This uploads the tag v1.0 to the remote repository.
Push all tags using --tags
To push all tags:
git push --tagsThis pushes all local tags that are not yet available on the remote.
Delete remote tags
To delete a remote tag:
git push origin :refs/tags/v1.0This removes the tag v1.0 from the remote repository.
Note:
- Deleting a tag locally does not remove it from the remote
- You must explicitly delete the tag on the remote
Working with tags is essential for versioning, release management, and tracking important milestones in your Git workflow.
Advanced git push Usage
Beyond basic usage, git push provides advanced capabilities that are useful in complex workflows such as multi-remote setups, controlled deployments, and repository mirroring.
Push to multiple remotes
To push to multiple remotes, you can define more than one remote repository and push changes individually:
git remote add upstream https://github.com/organization/repo.git
git push origin main
git push upstream main
This is useful when you want to keep multiple repositories in sync, such as pushing code to both a personal fork and an organization repository.
Push specific commits using refspec
You can also push specific commits or branches using refspec (reference specification):
git push origin local-branch:remote-branchExample:
git push origin feature:releaseThis pushes your local feature branch to the remote release branch. Refspec gives you flexibility to map local and remote branches explicitly, which is helpful in CI/CD or deployment workflows.
Mirror repositories using --mirror
Another advanced option is mirroring the entire repository:
git push --mirrorThis command pushes all refs (branches, tags, and deleted refs) to the remote, making it an exact copy of your local repository. It is commonly used for backups or migrations.
Important note:
--mirrorwill overwrite the remote repository completely- Use it carefully, especially in shared environments
Advanced git push usage is powerful but should be used with caution, as it directly affects remote repository structure and history.
Common git push Errors and Fixes
While using the git push command, you may encounter errors due to conflicts, outdated branches, or permission issues. Understanding these errors helps you quickly resolve problems and continue your workflow.
Error: failed to push some refs
This is one of the most common errors:
! [rejected] main -> main (non-fast-forward)
error: failed to push some refs
This happens when your local branch is behind the remote branch.
Fix:
git pull --rebase
git push
This ensures your local changes are updated with the latest remote commits before pushing. This error occurs when your git push is rejected because the remote branch has changes that are not present in your local repository.
Error: Updates were rejected (non-fast-forward)
Updates were rejected because the remote contains work that you do not have locally.This means someone else has pushed changes to the same branch.
Fix:
git pull origin main
git push origin main
Or for cleaner history:
git pull --rebase origin main
git push
Error: Permission denied (authentication issue)
Permission denied (publickey).
fatal: Could not read from remote repository.
This occurs when SSH keys or authentication are not configured properly; see could not read from remote repository for a full walkthrough.
Fix:
- Verify SSH key:
ssh -T git@github.com- Or switch to HTTPS remote:
git remote set-url origin https://github.com/user/repo.gitError: rejected (stale info) with force-with-lease
! [rejected] (stale info)This happens when using --force-with-lease and your local branch is outdated.
Fix:
git fetch
git push --force-with-lease
Error: src refspec does not match any
error: src refspec main does not match anyThis usually means:
- Branch does not exist
- No commits have been made
Fix:
git add .
git commit -m "initial commit"
git push -u origin main
Understanding these common git push errors, git push rejected scenarios, and git push fixes will help you troubleshoot issues quickly and use the git push command confidently. If a rejection happens because you deliberately rewrote history, see the git push force guide instead of pulling.
Frequently Asked Questions
1. What is git push?
2. What does git push do?
3. What is git push origin?
4. How to use git push command?
5. Why is git push rejected?
6. How to push a new branch in git?
7. How to push tags in git?
8. How to delete a remote branch using git push?
Summary
The git push command is an essential part of Git workflows, allowing you to upload local changes to a remote repository. From basic usage like pushing branches to advanced scenarios such as force push, upstream tracking, and repository mirroring, understanding how git push works helps you collaborate effectively and manage code safely.
By following best practices and understanding common scenarios, you can use git push confidently in both individual and team environments.